Military Wheels Kit 7250 GAZ-42 Truck & 120mm Mortar.
This GAZ truck is very interesting as it is gas fueled, making & cooling its own gas from a chassis mounted wood burner. Many other countries (including Germany) also used similar devices during WW2 to conserve supplies of petrol. According to the instructions 33,840 gas generating GAZ-42s vehicles were built - not sure if that figure is a typo, it does seem a lot.
About the kit.
The kit has all the parts to make the gas generating truck, an ammunition trailer, and a mortar & trailer. The truck also comes with a complete canvas cover, and one ammunition box for the mortar. The mortar can be built in the firing position on the ground, or folded up & mounted on its trailer.
As with most MW kits, most parts need a scrape with an exacto blade to take cast lines off the edge, or a light rub with sandpaper. Some mounting holes and cut outs are not properly formed, so using a drill bit, or knife tip to enlarge the holes or openings is needed. The parts on the sprues are cast quite crisply - not to the standard of the Big Lizard for sure, but are quite decent.
The Truck
Mostly a straightforward build, though the instructions are misleading as to the mounting point of the rear leaf springs to hold the rear axle. The leaf spring assembly needs to be mounted about 5 millimeters further forward than the instructions show. I notices this discrepancy early and didn't affix these parts till last to ensure I fixed them at the right point and at the right depth so that the vehicle was level and not "nose up" or "nose down".
The kit also supplies a clear windscreen and cabin doors, so that you can paint the frames carefully and leave the glass clear - good idea but I'm happy to put in my own glass, so didn't use these. Piture below of one glass door inserted to show it looks.
The model needs 6 wheels plus a spare, and you get a sprue with 16 wheels. Most are not very crisply cast, and the slots in the wheels are filled with flash on most. I found two front wheels that were almost flash free, so used them, but all rear wheels have indents for the slots, filled with plastic. The plastic is very much too thick to carve neat triangles into, so I will use dark brown or black paint in these recesses to highlight the indent, which should work sufficiently well to create the appearance of cut outs, after painting.
The inner hubs of the front and rear wheels need a lot of scraping with a knife blade to get a good fit between the axle and wheels.
The cab doors could be affixed in the open position, though they would need a lot of sanding as they are cast quite thick. The cab doors are a perfectly neat fit - no gaps, and no sanding or trimming needed. I have not glued them on to permit painting of interior cab and fitting of window glass later.
The gas fuel converters have indents where fittings attach, these need drilling out to neatly attach the small parts, and seam lines need sanding and a little filler.
The frame to hold the rear cargo tray need to have all the cut outs enlarged with a knife blade to get a neat join, this is essential to get a good fit.
The tarpaulin cover is cast slightly concave on the sides which is nice, but overall needs some wrinkles and stretch marks to look better. It comes in 5 parts, and fits well, but needs filler to hide the joins. Its a good base to improve on.
The Mortar.
The mortar trailer is a bit fiddly due to the shape and small size of some parts. I found parts numbered 101 a bit too short so used lengths of bent wire instead. Overall a bit of care is needed to get the shape right. The mortar base plate is very roughly cast on the underside. If mounted in firing position this cant be seen. If mounted on its trailer the underside of the base plate needs to be painted to look very muddy, which will accommodate the rough casting.
The Ammunition Trailer
This should have been the easiest part of the build, but actually is quite roughly cast. The raised pattern on the sides and lid is irregular in places. It would not be hard to replace the trailer body with plastic card and strip to get a neater finish.
Below are some in progress pictures, still working on some improvements, then painting and weathering to come.
In below picture, vehicle is part assembled, the two large flat 'muffler' shaped objects are part of the gas system, and lay underneath the cargo tray where they are not seen
This picture shows flash in wheel cut outs - however two front wheels were virtually flash free, which was useful

The mortar trailer and bottom of mortar base plate, showing the rough casting of the underneath

The ammunition trailer

Mortar mounted on its trailer, and truck near finished

GAZ-42 near completed, with optional 'clear side' door to allow frame to be painted, leaving glass 'paint free'

Truck with canopy - some filler will be needed on canopy joins

Headlights are concave, which will allow painting of interior & filling with expoxy or window maker. Kit does include clear plastic headlight lenses.

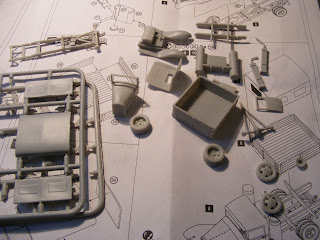
Below picture is of all the pieces assembled, excepting one rectangular ammunition box, not in this picture.

Update 29 July 2012.
I added a few bolt heads to the cargo tray metal brackets, and sanded off the cast on door handles and made new ones from bent wire, filed to shape.
Also applied first coat of paint, used Revell Matt 68 Enamel, thinned about 1 third paint 2 thirds thinners, lightly sprayed on all surfaces to check joins. I'll do all required filling and sanding, then apply another light coat of paint, something a bit lighter than the first coat to try to replicate the effect of areas that don't get direct light appearing to be a bit darker, compared to those areas that do get plenty of light.
Will then follow up with fitting painting the interior, & other exterior details, fitting doors, window glass, window wipers & give the build a wash, some weathering, and some dust.


Update 08 August 2012. Next job is to give the vehicle a wash. The objective of the wash is to highlight some details, and to add some subtle grime. To do this I chose the colour Raw Umber, in artist's oil paint. My tube is Daler Rowney brand, but any quality oil paint will do. I squeeze a little paint into a flat metal container, and add some mineral turpentine, sometimes called thinners (same turpentine as used to thin enamel paints or clean brushes after using enamel paints). Then the idea is not to mix the oil paint totally into the thinners, but to dab the brush near the dissolving oil paint blob, and swish it in the puddle of thinners so as to have mostly thinners, then paint the whole vehicle, fairly quickly. If too much brown oil paint is in evidence when you apply the brush to the model, clean the brush a bit in thinners and wipe the brush again over that area to remove and dilute the brown. Important - if your model is painted in enamel paints you must ensure its totally dry before using this technique, or else you may lift the paint job from the plastic ! To be safe I usually wait a couple of weeks at least after painting the model till I do the wash. Generally if your base coat has any odour you risk lifting off the base coat, when the base coat has no odour it indicates it is totally dry. For areas like the radiator & engine ventilating grills, I deliberately add more oil paint to the tip of the brush and gently apply to these arears to simulate grime, oil or and rust.
Below picture illustrates how adding a bit of extra oil paint to the brush gives the radiator grill a good dirty/rusty effect (click picture to enlarge)

Below picture shows my tube of Burnt Umber artist's oil paint, and the metal lid that I mix the paint and thinners in, prior to coating the model. A little extra grime was added to the gas canister behind the cab. By varying the amount of oil paint that is diluted in thinners, you can highlight detail, or create patches that can look, dirty, greasy, or rusty.

Rear tray and gas cylinders have been dirtied up a bit. Important to note that the more oil paint in the wash, the darker your overall paint job will become.


Update 12 August 2012. A light spray of watery dried mud has been applied, to the GAZ, ammunition trailer & mortar. Nothing is finished yet, I'm still working on the finish of all these components. A friend kindly emailed me a picture and a diagram, showing that the mortar trailer sometimes had different wheels to the spoked ones in the kit. In the photo they appear to be the same as GAZ truck wheels, and in the diagram seem to be the same wheels as on the ammunition trailer. I have spares of both types of wheels so may do a 'wheel change'. Another interesting fact is that this mortar impressed the germans so much that they copied it from 1943.


Below is a picture of the GAZ, ammunition trailer and mortar on its tralier. Nothing finished yet, also need to improve the canvas cover on the truck and paint it.


Update 15 August 2012. I have been working on the mortar carrier. First I removed the curved bars that the mortar attaches to, when its on the trailer, and replaced these with thinner wire, bent to shape. This was because the original wire I used looks too thick, compared to actual photos. Then I removed the spoked wheels from the mortar carrier, and replaced them with GAZ truck front wheels, as per the period photo.
Below can be seen the new (as yet unpainted) bars added to the mortar trailer. These are thinner wire and look more in scale than what I had previously. The mortar is folded up into transport position, but could be built in the 'firing' position.

Below can be seen the mortar trailer with mortar mounted on it for transport. The replacement GAZ wheels also need to be dirtied up a bit.

Another view of the ammunition trailer and mortar trailer, hitched together

Update 26 August 2012. The truck is finished for now. The doors have been put in place, but not glued, so that some crew can be put in the cab later. Front and rear cab windows are clear acetate cut to shape. Headlights were already hollowed out, these were painted silver & filled with liquid 'Window Maker'. Door handles were made from bent and filed wire. The window wiper is etch, (period photos show just one window wiper on the drivers side. The kit came supplied with a rear vision mirror but this was replaced with an etch mirror. I had sanded off the radiator cap when building the kit, another was made by cutting off a slice of strteched sprue. Also included in the kit is one small wooden box, and one mortar shell. I also modified the canvas canopy, but am not yet. happy with how it looks
Below is the kit rear vision mirror and an etch mirror - the etch mirror was used.

Below are the etch window wipers - the blade can be gently bent to an angle.

Below is the GAZ on a russian wagon, just for a photo
Below is he GAZ with the MW russian mobile field kitchen unit
 Last pictures are of the GAZ with its mortar and ammo tender


This GAZ truck is very interesting as it is gas fueled, making & cooling its own gas from a chassis mounted wood burner. Many other countries (including Germany) also used similar devices during WW2 to conserve supplies of petrol. According to the instructions 33,840 gas generating GAZ-42s vehicles were built - not sure if that figure is a typo, it does seem a lot.
About the kit.
The kit has all the parts to make the gas generating truck, an ammunition trailer, and a mortar & trailer. The truck also comes with a complete canvas cover, and one ammunition box for the mortar. The mortar can be built in the firing position on the ground, or folded up & mounted on its trailer.
As with most MW kits, most parts need a scrape with an exacto blade to take cast lines off the edge, or a light rub with sandpaper. Some mounting holes and cut outs are not properly formed, so using a drill bit, or knife tip to enlarge the holes or openings is needed. The parts on the sprues are cast quite crisply - not to the standard of the Big Lizard for sure, but are quite decent.
The Truck
Mostly a straightforward build, though the instructions are misleading as to the mounting point of the rear leaf springs to hold the rear axle. The leaf spring assembly needs to be mounted about 5 millimeters further forward than the instructions show. I notices this discrepancy early and didn't affix these parts till last to ensure I fixed them at the right point and at the right depth so that the vehicle was level and not "nose up" or "nose down".
The kit also supplies a clear windscreen and cabin doors, so that you can paint the frames carefully and leave the glass clear - good idea but I'm happy to put in my own glass, so didn't use these. Piture below of one glass door inserted to show it looks.
The model needs 6 wheels plus a spare, and you get a sprue with 16 wheels. Most are not very crisply cast, and the slots in the wheels are filled with flash on most. I found two front wheels that were almost flash free, so used them, but all rear wheels have indents for the slots, filled with plastic. The plastic is very much too thick to carve neat triangles into, so I will use dark brown or black paint in these recesses to highlight the indent, which should work sufficiently well to create the appearance of cut outs, after painting.
The inner hubs of the front and rear wheels need a lot of scraping with a knife blade to get a good fit between the axle and wheels.
The cab doors could be affixed in the open position, though they would need a lot of sanding as they are cast quite thick. The cab doors are a perfectly neat fit - no gaps, and no sanding or trimming needed. I have not glued them on to permit painting of interior cab and fitting of window glass later.
The gas fuel converters have indents where fittings attach, these need drilling out to neatly attach the small parts, and seam lines need sanding and a little filler.
The frame to hold the rear cargo tray need to have all the cut outs enlarged with a knife blade to get a neat join, this is essential to get a good fit.
The tarpaulin cover is cast slightly concave on the sides which is nice, but overall needs some wrinkles and stretch marks to look better. It comes in 5 parts, and fits well, but needs filler to hide the joins. Its a good base to improve on.
The Mortar.
The mortar trailer is a bit fiddly due to the shape and small size of some parts. I found parts numbered 101 a bit too short so used lengths of bent wire instead. Overall a bit of care is needed to get the shape right. The mortar base plate is very roughly cast on the underside. If mounted in firing position this cant be seen. If mounted on its trailer the underside of the base plate needs to be painted to look very muddy, which will accommodate the rough casting.
The Ammunition Trailer
This should have been the easiest part of the build, but actually is quite roughly cast. The raised pattern on the sides and lid is irregular in places. It would not be hard to replace the trailer body with plastic card and strip to get a neater finish.
Below are some in progress pictures, still working on some improvements, then painting and weathering to come.


GAZ-42 near completed, with optional 'clear side' door to allow frame to be painted, leaving glass 'paint free'


Kit Comments. As per my above comments, this kit is not a 'quick build' by any standard. The sprues don't look very inspiring when you open the box.
However, a surprisingly good looking GAZ and Mortar can be made, one just need to be careful removing small parts from sprues, & to take a little time to clean cast lines from parts.
Next job is to get this painted !
Update 29 July 2012.
I added a few bolt heads to the cargo tray metal brackets, and sanded off the cast on door handles and made new ones from bent wire, filed to shape.
Also applied first coat of paint, used Revell Matt 68 Enamel, thinned about 1 third paint 2 thirds thinners, lightly sprayed on all surfaces to check joins. I'll do all required filling and sanding, then apply another light coat of paint, something a bit lighter than the first coat to try to replicate the effect of areas that don't get direct light appearing to be a bit darker, compared to those areas that do get plenty of light.
Will then follow up with fitting painting the interior, & other exterior details, fitting doors, window glass, window wipers & give the build a wash, some weathering, and some dust.


Below picture illustrates how adding a bit of extra oil paint to the brush gives the radiator grill a good dirty/rusty effect (click picture to enlarge)

Below picture shows my tube of Burnt Umber artist's oil paint, and the metal lid that I mix the paint and thinners in, prior to coating the model. A little extra grime was added to the gas canister behind the cab. By varying the amount of oil paint that is diluted in thinners, you can highlight detail, or create patches that can look, dirty, greasy, or rusty.

Rear tray and gas cylinders have been dirtied up a bit. Important to note that the more oil paint in the wash, the darker your overall paint job will become.

Side view showing grime in rear cargo area, sides and gas cylinder. Its important to coat the whole vehicle with the wash before it dries, and not to go to heavy with the oil paint, use mainly thinners & very small amounts of oil paint mixed in to start with, you can always give it another wash later,

Update 12 August 2012. A light spray of watery dried mud has been applied, to the GAZ, ammunition trailer & mortar. Nothing is finished yet, I'm still working on the finish of all these components. A friend kindly emailed me a picture and a diagram, showing that the mortar trailer sometimes had different wheels to the spoked ones in the kit. In the photo they appear to be the same as GAZ truck wheels, and in the diagram seem to be the same wheels as on the ammunition trailer. I have spares of both types of wheels so may do a 'wheel change'. Another interesting fact is that this mortar impressed the germans so much that they copied it from 1943.


Below is a picture of the GAZ, ammunition trailer and mortar on its tralier. Nothing finished yet, also need to improve the canvas cover on the truck and paint it.


Update 15 August 2012. I have been working on the mortar carrier. First I removed the curved bars that the mortar attaches to, when its on the trailer, and replaced these with thinner wire, bent to shape. This was because the original wire I used looks too thick, compared to actual photos. Then I removed the spoked wheels from the mortar carrier, and replaced them with GAZ truck front wheels, as per the period photo.
Below can be seen the new (as yet unpainted) bars added to the mortar trailer. These are thinner wire and look more in scale than what I had previously. The mortar is folded up into transport position, but could be built in the 'firing' position.

Below can be seen the mortar trailer with mortar mounted on it for transport. The replacement GAZ wheels also need to be dirtied up a bit.

Another view of the ammunition trailer and mortar trailer, hitched together

Below is the kit rear vision mirror and an etch mirror - the etch mirror was used.

Below are the etch window wipers - the blade can be gently bent to an angle.

Below is the GAZ on a russian wagon, just for a photo
Below is he GAZ with the MW russian mobile field kitchen unit
 ,
,


No comments:
Post a Comment