Scratchbuilt Armoured Train wagon. Panzerzug 52 (ex Track Protection Train Blücher)
Hello
It has been a long time between posts. A few issues have kept me away from modelling. I decided to start something different.
I'm a fan of the variety of Armoured Trains and other related armoured and unarmoured vehicles that were used on railway lines used in Europe in WW2, particularly in the east, in the war between the germans and russians.
Tanks with big guns are the eye catching 'glamour' items of that war, but the reality was that tanks, and every other piece of war hardware was moved vast distances by trains, not by trucks, or aircraft or ships (except a very small percentage) on the eastern front. Ammunition, food, spares, replacements etc all was moved vast distances to keep the army formations and all the tanks, artillery, other armoured & unarmoured vehicles, & men that made up those armies, supplied. Without fuel, ammunition, and spares a tank was useless. Trains were the primary means of supply. One train could move as many supplies as hundreds of trucks. The trucks would need hundreds of drivers and were prone to flat tyres, freezing or over heating, getting bogged, and other mechanical breakdowns, and would use vast quantities of petrol. A train with 2 or 3 crew could move the same number of supplies, using just water and coal, which were plentiful and cheap, unlike petrol, which was in increasingly short supply as the war progressed. And trains of the era were much more reliable than the 1930s era designed trucks that were mostly in use.
The only problem with a vast rail network in conquered territory was that it was vulnerable to attack by partisans and infiltrators. It is well documented that the Germans encountered partisan activity from the early stages of their invasion, which only increased as the war progressed. And train lines and trains were a favoured target. To counter this the germans employed armoured trains (Panzerzugs) as well as other varieties of armoured and track protection trains. These were specifically factory designed by the Germans (as in the BP42 and BP44 designs). And many captured Russian trains were also used. Some army formations field engineered their own armoured trains from Russian rolling stock. Armoured trains and Track Protection trains were used for other duties also - in defensive and offensive operations against the Russian Armies, especially as the war progressed, and fighting moved onto German soil in Prussia and other eastern provinces of Germany.
Track Protection Train Blücher
Track Protection train Blücher was one such train. It was built on Russian rolling stock (Russian 60 tonne 4 axle flat wagons). Whether it was originally armoured and armed by the Russians and then captured by the Germans, and put to use is uncertain. It originally was armed with T-34 and T-70 turrets (and possibly T-26 turrets). This suggests it was originally a Russian fabrication, though the Germans were also known to make full use of captured Russian arms - so it can't be ruled out with certainty that this train was not a German construct, though it is most likely a Russian build.
No exact dates as to its build date and use are known. It had a camouflage pattern that was seen on both German and Russian armoured trains. The train probably was constructed in 1941 or 42, and may have come into German use as early as 1942. It is unknown what actions it took part in, but typically anti partisan and track protection activities, as well as in support of army units in both defensive and offensive actions were likely. Records show that in early 1944 Track Protection train Blücher was ordered to be rebuilt. In Autumn 1944 it was modified, with the T-34 turrets being replaced with Panzer IV H turrets. The full extent of modifications is unknown as so few pictures exist. Probably the flak position also was a 1944 modification. The train was rebirthed and rechristened as Panzer Zug 52.

Track Protection Train Blücher, in german markings, prior to 1944.

Panzerzug 52 (ex Track Protection Train Blücher) sometime from October 1944, rebuilt with a quad flak position in the rear, the T-34 turret replaced by a Panzer IV H turret, armoured splash guards added around turret, changes to external window openings. The full extent of changes is not known, and can't be gauged from this one photo.
Panzerzug 52
In October 1944 Panzerzug 52 was sent to Tilsit and took part in the recapture of Goldap in East Prussia in November 1944. In January 1945 it was ordered to Konigsberg, but was unable, escaping west via Marienburg before the line was cut by the Russians. It then saw action on the Vistula, then on the Konitz-Czersk-Preussisch-Stargard line. Panzerzug 52 was then ordered south west to Dirschau in late February 1945. It was unable to due to the Russians breaking through to the Baltic on 01 March 1945. As a bridge was blown it had no choice but to head back towards Gotenhafen (near Danzig). Panzerzug 52 fought in the Gross-Katz area and was captured in a Russian advance on 21 March 1945. (Source Wolfgang Sawodny, German Armoured Trains on the Eastern Front).
Construction
Problem with this build is that so little is known. Only a few poor quality pictures exist of the train. I used the only picture known of the '1944' update and used it as a guide. As the Panzer IV turret has known dimensions I used this as a point of reference to scale out all the other dimensions of the wagon to 1/72 scale.
The wagon chassis
What was very evident was that the wagon was built on a Russian 4 axle 60 tonne flat wagon, which was long enough and strong enough to carry two medium tanks, such as 2 x T-34s or 2 x Panzer IVs. This was a good choice for a chassis. These wagons were very similar to an American design. Whether they were imported from the USA or built under contract in Russia to an American design is not known. By comparison the German BP-42 and BP-44 wagons were built on 2 axle German Ommr wagons or 2 axle Russian wagons, which could only support a maximum of about 25 tonnes. This limited the thickness of armour that could be used on BP42/44 wagons to 30mm maximum, and as a result the BP42/44 wagons were very vulnerable to armour piercing shot. The thickness of the armour on this Panzerzug 52 wagon is unknown. The additional load capacity of these 4 axle wagons gave the builders the ability to apply thicker armour if they wished. I fashioned the sides from 1.0mm plastic card, using strips and rod for the smaller details.
 The above graphic of a Russian 60 tonne 4 axle wagon can be found at a very interesting site "Engines of the Red Army" http://www.o5m6.de/60-ton_4-axle_flatcar.html

The side frames of the chassis were scaled to 1/72 with a calculator and cut from 1.0mm plastic card

The side frames were then detailed with strips of card

A base was added and some strengthening strips. No attempt was made to accurately detail the underneath as no references could be found, and the underneath will be unseen.

Bogies added and fitted between two BP-44 armoured train cars to assess if height from rail was right.

Two T-34s were loaded on to see how they looked, as period photos show was a common load for these wagons.
The bogies (or trucks)
I started by finding appropriately shaped bogies (or trucks) of the 1930s era. Fortunately these were not hard to find, appears that similar designs of that era were used in many countries around the world. I found a pair of HO scale bogies. These have a gauge of 16.5mm. To emulate German gauge (1435mm) I needed to make them 19.93mm to be 1/72 scale. I cut axles in half, drilled holes in each end and used steel rod in the axles to make them the right width, then put some hollow plastic rod over the thin steel rod to cover it. The bogie frames were widened with plastic strip. The bogies are marginally not long enough, but are hidden behind steel skirts.

These bogies bear a very close resemblance to types seen on these wagons. The bogie on the left has had a start on sanding down the flanges to a closer to scale depth.

This picture shows the difference in width at 1/72 scale. The closest bogies now have a width of 19.93mm (or something very close to it) which is Standard Gauge. The bogies in HO scale are 16.5mm which is too narrow for 1/72 scale, and equals 1/87 scale. If left at 16.5mm they do not equate to any known gauge in 1/72 scale.
Body Construction
Using the only photo, parts were again scaled to 1/72.

Again 1.0mm card was used. First 2 sides were made and temporarily attached with Blu-Tack.
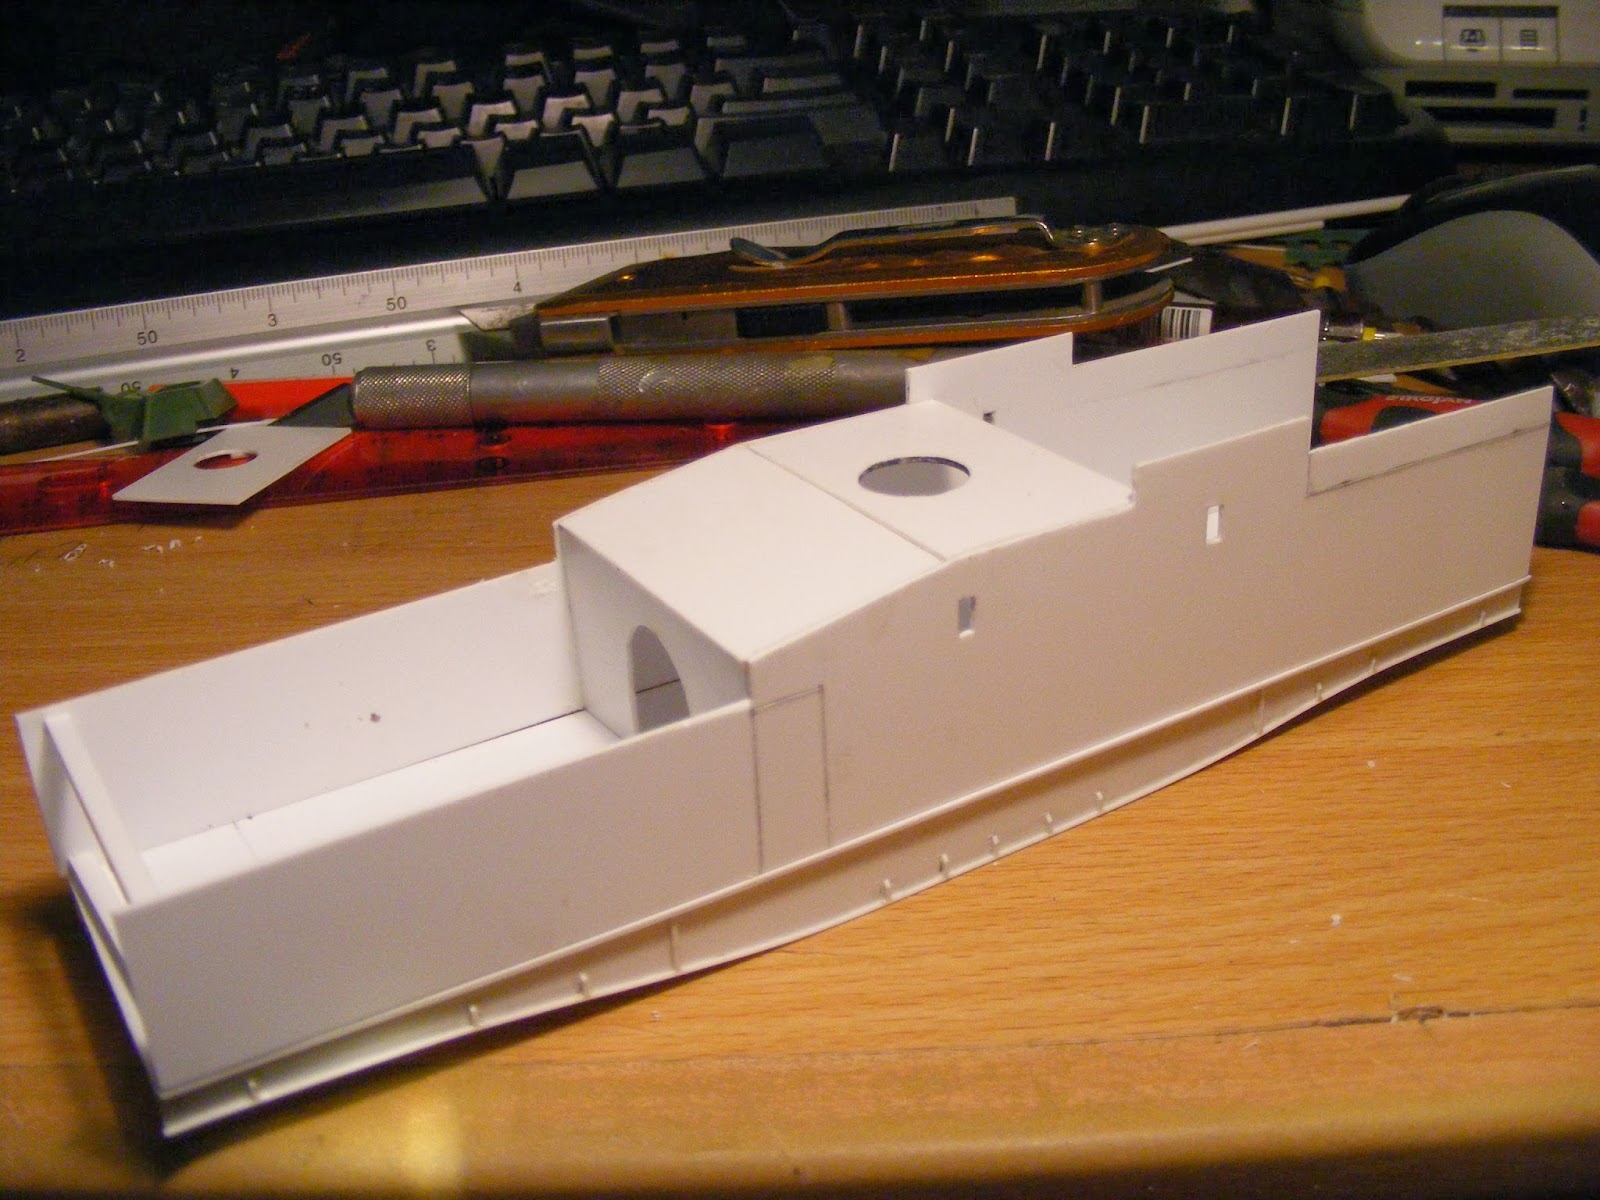
Then the cabin roof which housed the T-70 turret and the angled roof forward of that was added
 Next the forward compartment was made, the panel that housed the Pz IV turret and the angles pieces that made up the sides and front. Anti skid treadplate was cut and added to the raised floor of the Quad 20mm flak gun. Turrets were test fit.

 For fun I fit a T-34 turret to see how it looked compared to the known photo of Blücher. The T-34 turret was temporary, the Panzer IV turret will be inserted.
Next came smaller details - the splash guards for the forward turret, the armoured plates for the bogies and the couplings, door details, etc


Update Sunday 17 November 2013.
Hello.
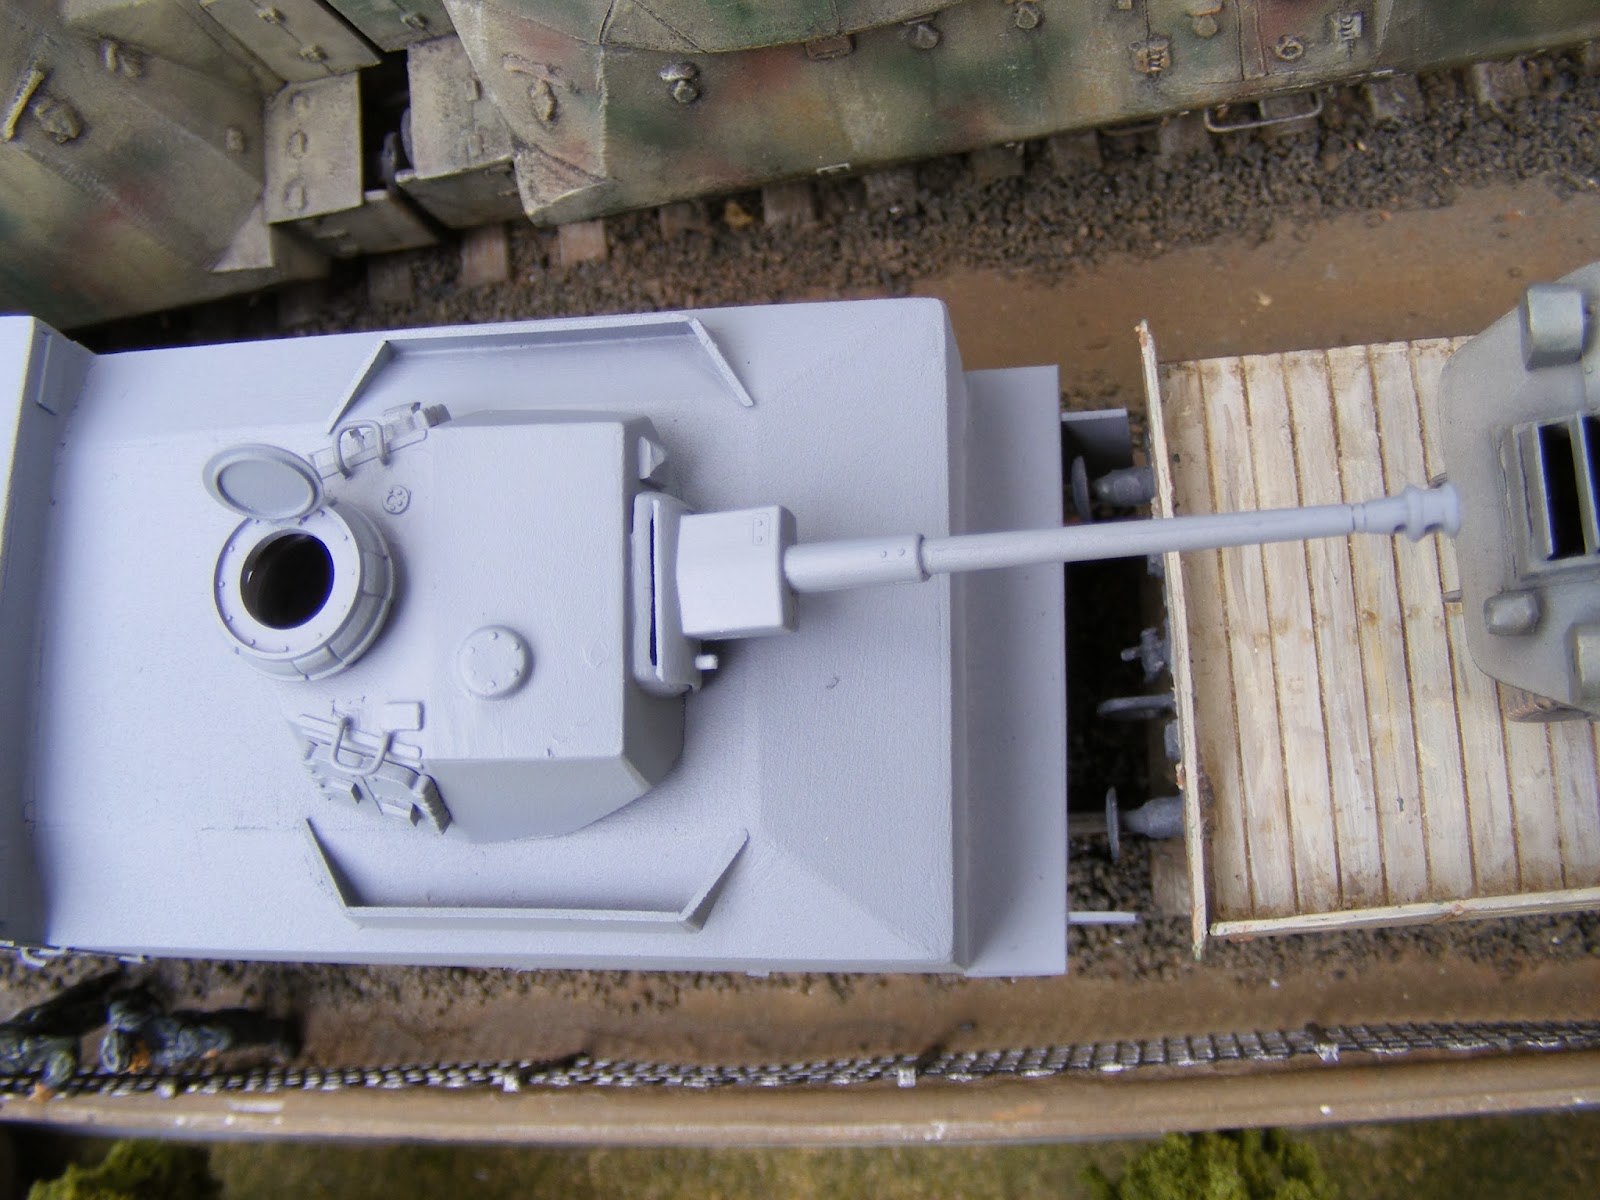
The armament has been completed and added
The Panzer IV turret is the basic Esci/Italeri. But has been modified. Details were added to the escape hatch doors, incorrect details were removed off turret roof. Grab handles were added above escape hatches, the turret mantlet was sanded down into a more correct shape, and vision block added to the front. Revell Panzer IV gun barrel added and Revell cupola and hatch added.
The T-70 turret was left as is, just needed careful sand in spots and a little filler, and barrel was drilled out
The quad flak started life on a ready built model. Barrels removed and replaced with brass, seats removed and refined and added back on, careful sanding and scraping of cast lines.
The reason I recycled some parts was the unavailability of buying a new quad flak or Revell Panzer IV turret. And I already have cannabalised other kits for turrets for Panzerjaeger cars, so did no want to add more unturreted Panzer IVs to my stash. The ready made quad flak was quite good - far superior to the old Esci/Italeri, and better than the MW offering, even before it was tidied up a bit and brass barrels were added.
Pics below of wagon in rattle can Humbrol grey primer


Updated Monday 21 April 2014.
Hello.I regret that it has been a long time since the last post.
No changes to the wagon, as it is finished, excepting a couple of details to the underchassis.
I have given the wagon a paint job, but am not sure if it is the best possible paint job for this wagon. I have posted a few pictures below. I may yet do a new paint job on the wagon.
Photos have not been "photoshopped" or changed in any way, only "cropped" to cut out unwanted detail. Pics take with Fuji Finepix camera on macro settings, with and without flash.


TO BE CONTINUED...
Hello
It has been a long time between posts. A few issues have kept me away from modelling. I decided to start something different.
I'm a fan of the variety of Armoured Trains and other related armoured and unarmoured vehicles that were used on railway lines used in Europe in WW2, particularly in the east, in the war between the germans and russians.
Tanks with big guns are the eye catching 'glamour' items of that war, but the reality was that tanks, and every other piece of war hardware was moved vast distances by trains, not by trucks, or aircraft or ships (except a very small percentage) on the eastern front. Ammunition, food, spares, replacements etc all was moved vast distances to keep the army formations and all the tanks, artillery, other armoured & unarmoured vehicles, & men that made up those armies, supplied. Without fuel, ammunition, and spares a tank was useless. Trains were the primary means of supply. One train could move as many supplies as hundreds of trucks. The trucks would need hundreds of drivers and were prone to flat tyres, freezing or over heating, getting bogged, and other mechanical breakdowns, and would use vast quantities of petrol. A train with 2 or 3 crew could move the same number of supplies, using just water and coal, which were plentiful and cheap, unlike petrol, which was in increasingly short supply as the war progressed. And trains of the era were much more reliable than the 1930s era designed trucks that were mostly in use.
The only problem with a vast rail network in conquered territory was that it was vulnerable to attack by partisans and infiltrators. It is well documented that the Germans encountered partisan activity from the early stages of their invasion, which only increased as the war progressed. And train lines and trains were a favoured target. To counter this the germans employed armoured trains (Panzerzugs) as well as other varieties of armoured and track protection trains. These were specifically factory designed by the Germans (as in the BP42 and BP44 designs). And many captured Russian trains were also used. Some army formations field engineered their own armoured trains from Russian rolling stock. Armoured trains and Track Protection trains were used for other duties also - in defensive and offensive operations against the Russian Armies, especially as the war progressed, and fighting moved onto German soil in Prussia and other eastern provinces of Germany.
Track Protection Train Blücher
Track Protection train Blücher was one such train. It was built on Russian rolling stock (Russian 60 tonne 4 axle flat wagons). Whether it was originally armoured and armed by the Russians and then captured by the Germans, and put to use is uncertain. It originally was armed with T-34 and T-70 turrets (and possibly T-26 turrets). This suggests it was originally a Russian fabrication, though the Germans were also known to make full use of captured Russian arms - so it can't be ruled out with certainty that this train was not a German construct, though it is most likely a Russian build.
No exact dates as to its build date and use are known. It had a camouflage pattern that was seen on both German and Russian armoured trains. The train probably was constructed in 1941 or 42, and may have come into German use as early as 1942. It is unknown what actions it took part in, but typically anti partisan and track protection activities, as well as in support of army units in both defensive and offensive actions were likely. Records show that in early 1944 Track Protection train Blücher was ordered to be rebuilt. In Autumn 1944 it was modified, with the T-34 turrets being replaced with Panzer IV H turrets. The full extent of modifications is unknown as so few pictures exist. Probably the flak position also was a 1944 modification. The train was rebirthed and rechristened as Panzer Zug 52.
Track Protection Train Blücher, in german markings, prior to 1944.
Panzerzug 52 (ex Track Protection Train Blücher) sometime from October 1944, rebuilt with a quad flak position in the rear, the T-34 turret replaced by a Panzer IV H turret, armoured splash guards added around turret, changes to external window openings. The full extent of changes is not known, and can't be gauged from this one photo.
Panzerzug 52
In October 1944 Panzerzug 52 was sent to Tilsit and took part in the recapture of Goldap in East Prussia in November 1944. In January 1945 it was ordered to Konigsberg, but was unable, escaping west via Marienburg before the line was cut by the Russians. It then saw action on the Vistula, then on the Konitz-Czersk-Preussisch-Stargard line. Panzerzug 52 was then ordered south west to Dirschau in late February 1945. It was unable to due to the Russians breaking through to the Baltic on 01 March 1945. As a bridge was blown it had no choice but to head back towards Gotenhafen (near Danzig). Panzerzug 52 fought in the Gross-Katz area and was captured in a Russian advance on 21 March 1945. (Source Wolfgang Sawodny, German Armoured Trains on the Eastern Front).
Construction
Problem with this build is that so little is known. Only a few poor quality pictures exist of the train. I used the only picture known of the '1944' update and used it as a guide. As the Panzer IV turret has known dimensions I used this as a point of reference to scale out all the other dimensions of the wagon to 1/72 scale.
The wagon chassis
What was very evident was that the wagon was built on a Russian 4 axle 60 tonne flat wagon, which was long enough and strong enough to carry two medium tanks, such as 2 x T-34s or 2 x Panzer IVs. This was a good choice for a chassis. These wagons were very similar to an American design. Whether they were imported from the USA or built under contract in Russia to an American design is not known. By comparison the German BP-42 and BP-44 wagons were built on 2 axle German Ommr wagons or 2 axle Russian wagons, which could only support a maximum of about 25 tonnes. This limited the thickness of armour that could be used on BP42/44 wagons to 30mm maximum, and as a result the BP42/44 wagons were very vulnerable to armour piercing shot. The thickness of the armour on this Panzerzug 52 wagon is unknown. The additional load capacity of these 4 axle wagons gave the builders the ability to apply thicker armour if they wished. I fashioned the sides from 1.0mm plastic card, using strips and rod for the smaller details.
The side frames of the chassis were scaled to 1/72 with a calculator and cut from 1.0mm plastic card
The side frames were then detailed with strips of card
A base was added and some strengthening strips. No attempt was made to accurately detail the underneath as no references could be found, and the underneath will be unseen.
Bogies added and fitted between two BP-44 armoured train cars to assess if height from rail was right.
Two T-34s were loaded on to see how they looked, as period photos show was a common load for these wagons.
The bogies (or trucks)
I started by finding appropriately shaped bogies (or trucks) of the 1930s era. Fortunately these were not hard to find, appears that similar designs of that era were used in many countries around the world. I found a pair of HO scale bogies. These have a gauge of 16.5mm. To emulate German gauge (1435mm) I needed to make them 19.93mm to be 1/72 scale. I cut axles in half, drilled holes in each end and used steel rod in the axles to make them the right width, then put some hollow plastic rod over the thin steel rod to cover it. The bogie frames were widened with plastic strip. The bogies are marginally not long enough, but are hidden behind steel skirts.
These bogies bear a very close resemblance to types seen on these wagons. The bogie on the left has had a start on sanding down the flanges to a closer to scale depth.
This picture shows the difference in width at 1/72 scale. The closest bogies now have a width of 19.93mm (or something very close to it) which is Standard Gauge. The bogies in HO scale are 16.5mm which is too narrow for 1/72 scale, and equals 1/87 scale. If left at 16.5mm they do not equate to any known gauge in 1/72 scale.
Body Construction
Using the only photo, parts were again scaled to 1/72.
Then the cabin roof which housed the T-70 turret and the angled roof forward of that was added
Next came smaller details - the splash guards for the forward turret, the armoured plates for the bogies and the couplings, door details, etc
Update Sunday 17 November 2013.
Hello.
The armament has been completed and added
The Panzer IV turret is the basic Esci/Italeri. But has been modified. Details were added to the escape hatch doors, incorrect details were removed off turret roof. Grab handles were added above escape hatches, the turret mantlet was sanded down into a more correct shape, and vision block added to the front. Revell Panzer IV gun barrel added and Revell cupola and hatch added.
The T-70 turret was left as is, just needed careful sand in spots and a little filler, and barrel was drilled out
The quad flak started life on a ready built model. Barrels removed and replaced with brass, seats removed and refined and added back on, careful sanding and scraping of cast lines.
The reason I recycled some parts was the unavailability of buying a new quad flak or Revell Panzer IV turret. And I already have cannabalised other kits for turrets for Panzerjaeger cars, so did no want to add more unturreted Panzer IVs to my stash. The ready made quad flak was quite good - far superior to the old Esci/Italeri, and better than the MW offering, even before it was tidied up a bit and brass barrels were added.
Pics below of wagon in rattle can Humbrol grey primer
Updated Monday 21 April 2014.
Hello.I regret that it has been a long time since the last post.
No changes to the wagon, as it is finished, excepting a couple of details to the underchassis.
I have given the wagon a paint job, but am not sure if it is the best possible paint job for this wagon. I have posted a few pictures below. I may yet do a new paint job on the wagon.
Photos have not been "photoshopped" or changed in any way, only "cropped" to cut out unwanted detail. Pics take with Fuji Finepix camera on macro settings, with and without flash.
TO BE CONTINUED...
Looking good neil will be a great adition to your armoured trains.
ReplyDeletei have scaled up some plans for a panzerjager-triebwagen i intend to scratchbuild.
when you sprayed your armoured train did you go cam ,gloss,wash,mat order as there dont seem that you can go many coats over that detail before you cover it over?.
Bazer
Hi Bazer. Somewhere "down the track" I would like to scratch a Pzr Triebwagen as well. Good luck with yours, I'd be interested to see how you go.
ReplyDeleteThe detail on the lower chassis is much more defined than the average kit in this scale. A few coats of spray paint won't diminish the details appearance. The sides seem to be smooth and unbolted/unrivetted, would seem to be neatly welded in reality, very hard to see small details on the pictures of the real thing.
This armoured wagon has just one coat of Humbrol 'rattle can' acrylic undercoat at this stage. I'm not going to finish painting until I have a new reference book coming that might have clearer pictures of the wagon, so I can do any modifications first.
When its ready for top coat, I will pre shade (with a dark grey or black) around details and lower areas and areas that would naturally be ins shade, then will top coat with a light spray of acrylic (probably yellow). I'll build up the coat is some areas, and go lighter in others to try to replicate the effects or natural light and shadow. Then do a wash with very diluted black over everything .Then lightly spray some grime on the lower areas. Then will do some dry brush highlights on some areas and small details to make them stand out a bit.
cheers
Neil
Incredible work ! Congratulation.
ReplyDeleteWow! What a fun/fascinating project. Well done. Best, Seb
ReplyDeleteSad that your blog seems to be on a 'hiatus' - hope nothing serious has caused the pause? I regularly check back, mostly because your blog is such a terrific resource for Soviet trucks. Anyway, hope all is well. Steve the Kitnoob.
ReplyDelete