RPM Kit 72215, Bergeschlepper 731 (f) (in progress status)
Hello. Large numbers of Renault R-35s fell into german hands in 1940. Many had the turrets removed and were used as Artillery or Ammunition tractors. In russian mud conditions a light tracked vehicle could travel where wheeled vehicles could not, making these vehicle of use. Being turretless the vehicles had no defence, other than the crew's own personal weapons. To rectify this at least one vehicle had an MG and shield added. This kit comes with an MG34 and small shield that was mounted on the turret ring for self defence. Two period photos exist of these MG mounted Schleppers.
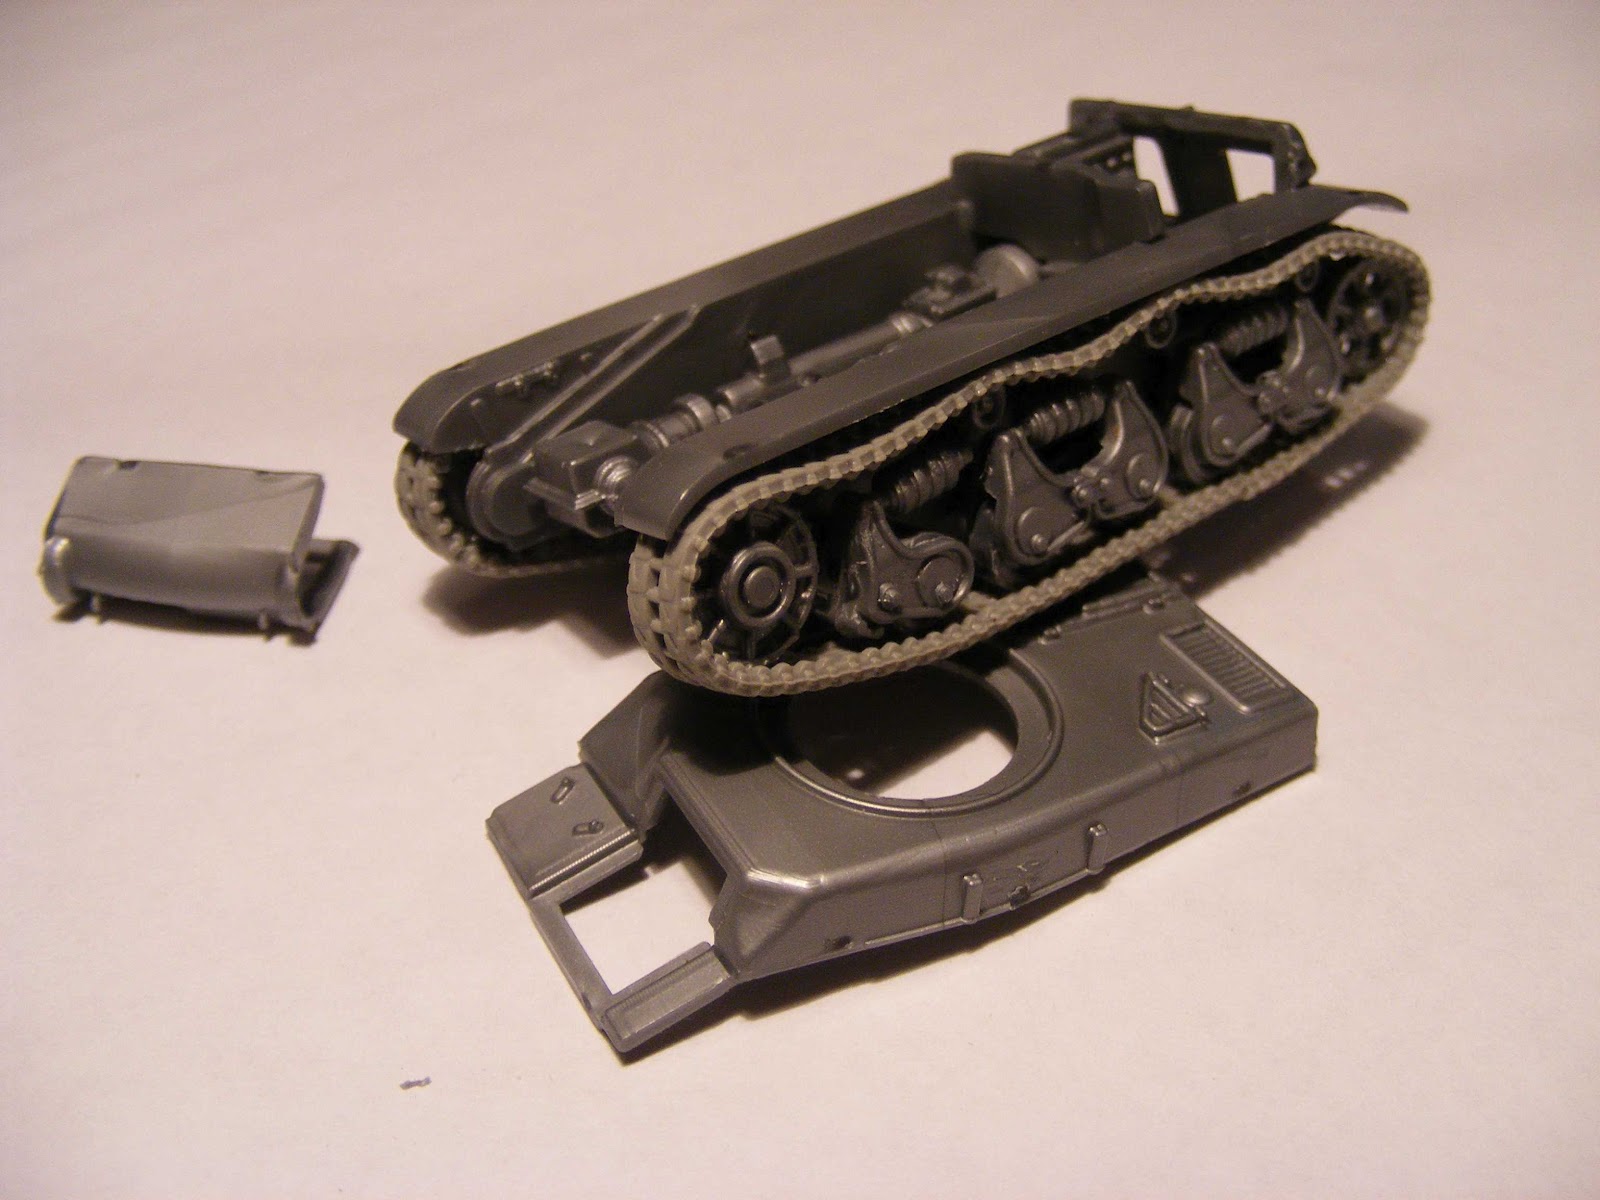
Kit Construction Comments. Most of the parts are very finely moulded for such a tiny vehicle. One thing stands out as being too oversimplified, which are the tracks. These are cast as a solid thick piece, with no exterior or side details, & faint details on he inside of the track.

First job was to cut and file these off the roadwheels & sprockets. As these wheels are cast into the track they were imperfectly rounded as a result, but this is mainly hidden with new tracks. I used rubber tracks from Revell's Panzer II (ex Matchbox) as these are fairly close in design, though not exact. You could not do this is in a larger scale, as the differences would be too apparent. A sag was built in along the top row of track. Track was affixed to the running gear with liquid brush on super glue.


The suspension should have some more much tinier bolts, but very difficult to make and add 'in scale' bolts, these are so small that they are often not visible in period photos, so will leave these off.
Next job was to make a driver's seat from wire and plastic card and replace the hand controls with stretched sprue & fit these parts. I then painted the interior, though it can barely be seen, even without a turret.
I searched 'Renault R-35 Walkaround' and found plenty of pictures, that indicate a green floor, brown seat covers, and white walls, while the drive train was also green, so painted accordingly. Admittedly these photos may show a museum repaint since WW2, but these colours are fairly consistent with what you would expect, unlikely that the germans would bother repainting the internal green floor and drive train, and off white coloured walls is also consistent with german interior paint jobs, whether this was original in french service or not.
The door handles at the rear were replaced with stretched sprue bent to shape.

The rest of the build was then completed. My kit was missing part 14, the postal service delivered the box in flattened condition, so may never have arrived, or I may have lost it. I made another part from evergreen strips glued together and sanded to shape.
I also filed down the mudguard profile, was too thick, is now much leaner.
I have placed the MG & shield on the build, but these will not be affixed, this tank will have a T-26-1 turret affixed, when it arrives in the mail, as per several romanian and at least one german conversion.
I still need to tidy up some small details with an excato blade & check if any filler needed, then a base coat will be painted


Next is an all over undercoat of Humbrol Matt 77 enamel.
Next job will be to do more fine sanding & filling where needed, before further painting can continue.

Update 02 September 2012. I finally received the UMMT T-26-1, which will be the donor kit for the turret. There is one photo of one of these R-35s with a T-26-1 turret (see below photo)
According to research found on the web, the Romanian army had captured numbers of T-26 tanks and in the second half of 1942 sought to upgun their R-35s by removing the original turret with 37mm cannon, and replacing it with a T-26 turret, armed with a 45mm cannon. Later they modified the R-35 turret to take the captured 45mm guns.

At first I thought to make this a romanian vehicle, but lacked markings, or any knowledge what the markings should be, so have opted to make it one supplied to the germans for evaluation and trials, as per the only known picture. This is pure guesswork as to how or why one of these is in german markings, as the photo cannot tell us more.
Below is the tank with turret, painted as Romanian with a coat of Revell Enamel Matt Green 86, then washed with Citadel 'Devlan Mud'

Here the tank has been resprayed with Revell enamel Matt Grey 79. Have yet to apply any washes, and still need to paint tracks, and other details, apply some dust, so washes etc, and need to find some german crosses to match the old period photo.


Update 09 October 2012. The only known photo of this little beast shows it in german markings. Its documented that the Romanians did these conversions, possibly the germans requested one for trials, or perhaps this was a one off field conversion that may or may not have had turret traverse capability. No matter how the germans acquired their T-26 turreted R-35, it appears to be in Panzer Grey which is consistent with the time period. I gave the vehicle another wash in Citadel Devlan Mud to darken its appearance and create some streaks, and used appropriately sized german crosses from the spares box. Next job is to dust up the vehicle a bit


Update 10 October 2012. Next step was to spray the lower surfaces with very diluted Model Master Italian Sand enamel. (see below picture)

Then the running gear was again brushed over with Citadel Devlan Mud, and specks of Devlan Mud were applied at random to represent splashes. (see below pictures)


Other than drilling out the gun barrel, & eventually making/placing this one onto a diorama, this one is now completed.
Hello. Large numbers of Renault R-35s fell into german hands in 1940. Many had the turrets removed and were used as Artillery or Ammunition tractors. In russian mud conditions a light tracked vehicle could travel where wheeled vehicles could not, making these vehicle of use. Being turretless the vehicles had no defence, other than the crew's own personal weapons. To rectify this at least one vehicle had an MG and shield added. This kit comes with an MG34 and small shield that was mounted on the turret ring for self defence. Two period photos exist of these MG mounted Schleppers.
Kit Construction Comments. Most of the parts are very finely moulded for such a tiny vehicle. One thing stands out as being too oversimplified, which are the tracks. These are cast as a solid thick piece, with no exterior or side details, & faint details on he inside of the track.

First job was to cut and file these off the roadwheels & sprockets. As these wheels are cast into the track they were imperfectly rounded as a result, but this is mainly hidden with new tracks. I used rubber tracks from Revell's Panzer II (ex Matchbox) as these are fairly close in design, though not exact. You could not do this is in a larger scale, as the differences would be too apparent. A sag was built in along the top row of track. Track was affixed to the running gear with liquid brush on super glue.


Next job was to add some bolt heads to the suspension, as per photos of R-35s. This was done by drilling small holes with a 'number 75' micro drill bit. I then get out my jar of micro water filter balls, and select some the right size, and pick them up with a dampened toothpick, its then easy to place them into the drilled holes where they are a snug fit and won't fall out. If a bit loose I lightly coat with paint or acrylic clear varnish.


The suspension should have some more much tinier bolts, but very difficult to make and add 'in scale' bolts, these are so small that they are often not visible in period photos, so will leave these off.
Next job was to make a driver's seat from wire and plastic card and replace the hand controls with stretched sprue & fit these parts. I then painted the interior, though it can barely be seen, even without a turret.
I searched 'Renault R-35 Walkaround' and found plenty of pictures, that indicate a green floor, brown seat covers, and white walls, while the drive train was also green, so painted accordingly. Admittedly these photos may show a museum repaint since WW2, but these colours are fairly consistent with what you would expect, unlikely that the germans would bother repainting the internal green floor and drive train, and off white coloured walls is also consistent with german interior paint jobs, whether this was original in french service or not.
The door handles at the rear were replaced with stretched sprue bent to shape.

The rest of the build was then completed. My kit was missing part 14, the postal service delivered the box in flattened condition, so may never have arrived, or I may have lost it. I made another part from evergreen strips glued together and sanded to shape.
I also filed down the mudguard profile, was too thick, is now much leaner.
I have placed the MG & shield on the build, but these will not be affixed, this tank will have a T-26-1 turret affixed, when it arrives in the mail, as per several romanian and at least one german conversion.
I still need to tidy up some small details with an excato blade & check if any filler needed, then a base coat will be painted


Next is an all over undercoat of Humbrol Matt 77 enamel.
Next job will be to do more fine sanding & filling where needed, before further painting can continue.

Update 02 September 2012. I finally received the UMMT T-26-1, which will be the donor kit for the turret. There is one photo of one of these R-35s with a T-26-1 turret (see below photo)
According to research found on the web, the Romanian army had captured numbers of T-26 tanks and in the second half of 1942 sought to upgun their R-35s by removing the original turret with 37mm cannon, and replacing it with a T-26 turret, armed with a 45mm cannon. Later they modified the R-35 turret to take the captured 45mm guns.

At first I thought to make this a romanian vehicle, but lacked markings, or any knowledge what the markings should be, so have opted to make it one supplied to the germans for evaluation and trials, as per the only known picture. This is pure guesswork as to how or why one of these is in german markings, as the photo cannot tell us more.
Below is the tank with turret, painted as Romanian with a coat of Revell Enamel Matt Green 86, then washed with Citadel 'Devlan Mud'

Here the tank has been resprayed with Revell enamel Matt Grey 79. Have yet to apply any washes, and still need to paint tracks, and other details, apply some dust, so washes etc, and need to find some german crosses to match the old period photo.


Update 09 October 2012. The only known photo of this little beast shows it in german markings. Its documented that the Romanians did these conversions, possibly the germans requested one for trials, or perhaps this was a one off field conversion that may or may not have had turret traverse capability. No matter how the germans acquired their T-26 turreted R-35, it appears to be in Panzer Grey which is consistent with the time period. I gave the vehicle another wash in Citadel Devlan Mud to darken its appearance and create some streaks, and used appropriately sized german crosses from the spares box. Next job is to dust up the vehicle a bit


Update 10 October 2012. Next step was to spray the lower surfaces with very diluted Model Master Italian Sand enamel. (see below picture)

Then the running gear was again brushed over with Citadel Devlan Mud, and specks of Devlan Mud were applied at random to represent splashes. (see below pictures)


Other than drilling out the gun barrel, & eventually making/placing this one onto a diorama, this one is now completed.
very neat!
ReplyDeleteGreat model you have made there!
ReplyDeleteThis comment has been removed by the author.
ReplyDeleteSorry, I wanted to edit this to check the "notify me" check box. Here's my post again:
DeleteThis is Tim from the R35 Tracks topic on Missing-Lynx. :) I have some Matchbox tracks I can use on mine. But may I ask how you modelled the sag?
I usually drill holes in the side of the hulls I model that have rubber tracks and glue metal staples or brass rod sticking out to hold the track down. It doesn't look like you've done this.
Thanks in advance.