Friday, December 21, 2012

S-Model PS720009 Pz.Kpfw 38H735(f)

S-Model PS720009 Pz.Kpfw 38H735(f)

I had seen this kit on the web, and was pleased to see it stocked in my Local Hobby Store, so picked one up.  I'm a fan of french WW2 armour, and given the wide variety of french armoured vehicles that existed in that era, as a whole french armour (and softskins) really are very under represented in small scale in plastic.

Its well known that the germans inherited large numbers of french armoured vehicles in 1940 and put them all to use. Some went to german allies in eastern europe, some went to the balkan regions on anti partisan & security duties, while others remained in France on garrison duties. Numbers were still in France in 1944 after the D Day landings.

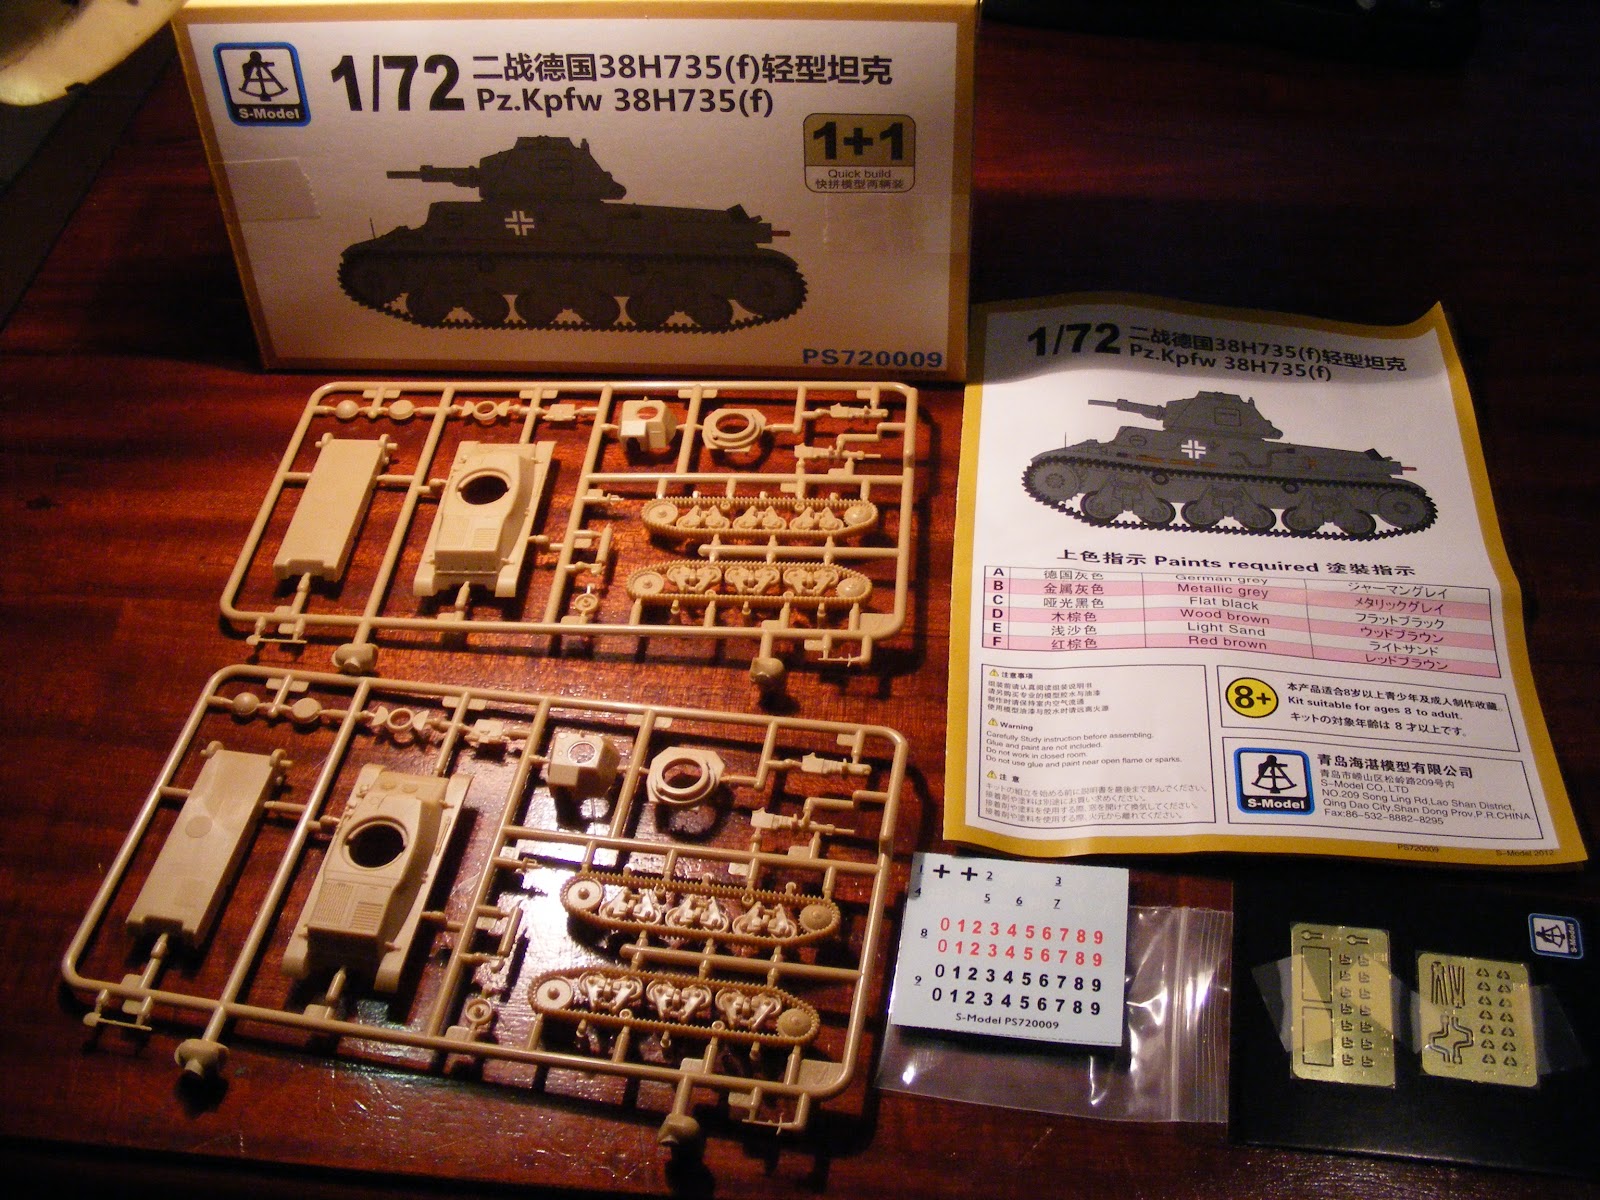
In the box. In the box are two sprues of parts sufficient to make up two tanks. One set of brass parts, one sheet of decals, one instruction sheet. The parts are well cast, and flash is virtually non existent. Two options for main armament are provided for each tank. Two german style turret cupola options are provided with open and closed hatches for each tank. One rounded turret cupola option is provided which looks to be the original french style cupola - nice if you want to build one in french service, though no decals or painting options are provided if you choose to go that way.


Scale. I don't often measure vehicles for scale, but in this case I checked the web for length and width. Assuming the published data is correct this vehicle scales very well to 1/72 scale, length is correct and width is perhaps 1 mm less.

The build so far. The build is very easy and everything fits very well (but is not finished).  The rear hatch hinges nicely, so can be open or closed, the hatch does not have to be fixed in place. Both barrel ends are already open, so no need to drill them out. The tiny letters 'HOTCHKISS' are cast on the bow of the vehicle.The body shell has a texture to it (it is not smooth) which gives it a kind of cast metal patina.


Update 22 December 2012. I have now attached the front and rear etch towing hooks and shackles, and also the hook and shackle on each side. These are very tiny and were the most time consuming part of the build, and are held in place with a tiny droplet of liquid CA glue, applied with a tooth pick. The etch covers for the exhaust muffler were also rolled and affixed.


Below are tanks almost ready ready for paint. The tools and a few other parts won't be added until painting is finished as they will get in the way.


Below are the spare parts left over - open and closed german style cupola and hatches, french style cupola, and long and short 37mm guns.


Next up I need to apply a tiny amount of filler around the turret join, and the front and rear hull join, before painting.

Update Sunday 03 February 2013. Both tanks were given a light pre shading with Tamiya Flat Black, and left to dry for a few hours. Each was the lightly sprayed with Humbrol Enamel Matt 94, heavier on the upper surfaces, to create some contrast in shading as occurs in natural sunlight. A few hours later a lighter shade, Humbrol Enamel Matt 148 was lightly applied to the upper sufraces over the Matt 94.

Next day I did a very light wash all over with watered down "Devlan Mud" which is a Citadel acrylic wash. This bought out some details as some detail is very lightly cast. Tracks were brush painted with a 00 brush with Vallejo Panzer Aces 'Track Primer"


Update 20 February 2012. I have these close enough to completed. They could maybe use a little dust or muddy splashes but for now they are finished.

I added the jack and spare wheel but did not add the shovel, pick, crank handle or wire cutters. Period photos show these tanks frequently did not carry these tools when in german service.


Things to look out for

1) the join lines of upper and lower hull and upper and lower turret halves. These joins can't be seen with the Mark 1 Eyeball, but if you take macro photos you will notice the joins.

2) the tow hooks and U bolts at each end and on each side are etch - very tiny and very easy to lose. You need CA glue to affix these, and tweezers and a steady hand. A few spares are provided in the kit which as great, I used my spares, to replace ones lost while painting.

Final Comments. These are a great pair of tanks. 4 geramn cupolas (open and closed) and 2 french cupolas, 4 tank cannon, and a good range of numerals on the decal sheet. The hinged rear opening hatch on the turrets is another nice touch.

Two outdoor shots below were taken against the evening sky.


TO BE CONTINUED.


Monday, November 5, 2012

Hobbyboss kit 82913 German WR360 C12 Locomotive

Hobbyboss kit 82913 German WR360 C12 Locomotive.

I had heard this kit was planned for release by Hobbyboss earlier this year. However I didn't get too excited as I know sometimes it can take years from "planned" release to "actual" release. I was pleased when when I was advised that this kit was available a few weeks back. I enquired at my Local Hobby Store (LHS) if they would be getting this kit in, but they could give me no answer. I searched Online and found a retailer that had a good reputation, and ordered two of these kits, and today they arrived.

Very few kits that I buy get started the same day as I get them. But this was one of those few, this kind of release is an unusual event, and to be enjoyed. Its only the 2nd locomotive from the DR from the WW2 era, the other being the Kriegslokomotive, also being a Hobbyboss release some years ago.

In the box. The box is large compared to most 1/72 scale kits, for a moment I thought they must have sent me 1/35th scale, but a quick check of the box confirmed that the kit was 1/72 scale. All parts and sprues are sealed in plastic bags, with a small amount of foam padding around some of the smaller parts to protect them which was a nice touch. The box construction is quite strong compared to most manufacturers boxes, and everything arrived in perfect condition. As well as the sprues of light brown coloured parts for the locomotive, and the rail track and its roadbed, there is also a sprue of clear parts for the windows, a set of decals, a coloured painting guide, and a 12 page booklet of instructions. The instructions are very clear and detailed as to positioning of parts.

The decals are 'DB' which is for the post war Federal (or West) German Railway. I would have liked to have seen a set of 'DR'  (of WW2 Reich era) decals also, or in place of the DB decals, particularly as the box illustration shows the locomotive in WW2 era use. Though 'DR' decals would be welcome it does seem that  these locomotives  in military use do not have 'DR' marked on them, as they were not part of the civilian railway system.

Full set of instructions & painting guide can be found at :  http://henk.fox3000.com/hobbyboss.htm


RESEARCH ON THE SUBJECT  I have spent many hours researching this locomotive, & the research is ongoing, so what I have found to date is provisional, and may be amended as more becomes known, so will post the total research here in time.


Was this a military locomotive ? Answer seems to be yes. The 'W' in its designation refers to 'Wehrmacht'. The 'R' for Rangierslok being an abbreviation of "Shunting Locomotive".  Railways were the primary means of transporting men, supplies, vehicles & equipment throughout the war & for transferring military units of all sizes from one location to another. These locomotives were a shunting type of locomotive and would have assisted in the marshalling of freight trains for military purposes. They also were used in industrial areas engaged in military production,  harbours and ports. Freight trains were hauled by heavy steam locomotives to their destinations, not by these diesel locomotives. These diesel locomotives could  be used to haul freight wagons over short distances. The diesels were excellent for military use as they did not emit smoke, the way steam engines do which gave away their location, and diesels do not emit sparks which made them safer to use around fuel, explosives and ammunition production plants & storage facilities.

How many were built ? This kit is the WR360 C12 type of which 10 were built in 1938. An almost identical model designated the WR360 C14 went into widespread production from up to late 1944 - a total of 261 being built, at more than 7 different plants, including Henschel and Krupp. After the war another 44 of these were built. Main difference between the C12 & C14 was the axle loading (12 & 14 tonnes per axle respectively).

What is the difference between the C12 and C14 models ?

It has been reported there is a length difference of  350mm between the C12 & C14. I have yet to confirm if this is correct or incorrect information.And if the length does differ, which was the shorter, the C12 or C14.

It has been stated on the web on one site that the C12 had vertical radiator louvres and the C14 had horizontal louvres. Radiator louvres are not a reliable way to differentiate C12 from C14 versions.

Two different period Builder's Photographs of a WR360 show only vertical louvres. One has been identified as a C12. The other's type is unidentified. They both have identifiably differing paint schemes, this may be due to the fact that the C12s were built by two different manufacturers (BMAG, O&K), and the C14s were constructed at seven different manufacturers workshops (BMAG, O&K, Deutz, Jung, DWK, Henschel, & Krupp).

 There are many post war photos of WR360s, taken up to the present day and most have horizontal louvres over the radiator (but not all have). The horizontal louvres look to be an addition added on top of the radiator vents, to control cooling & possibly in place to prevent dust, rain, ice and snow from affecting the radiator & cooling system. The horizontal louvre covers seem to be a later addition - and could have been added at any time after manufacture, or in any decade after the war had ended. There is a photograph of a WR360 C14 number 26139 built at the Henschel works in 1943, which was photographed at Schaarbeck in 1995 that clearly has the original vertical louvres, which is evidence enough that horizontal louvres are not proof of the type.  WR360 C14 number 26140 is preserved in Neustadt museum and also does not have horizontal louvres. Both these were built by Henschel, though this is not enough proof to state that all WR360 C14 built by Henschel works can be identified by vertical louvres.

How were these painted ? I found a few war time photos of WR360 locomotives. In post war times these have been repainted in various colours and some have been modified, so post war pictures though plentiful are of little use for a war time model.

One high quality builder's photo of a brand new WR360 indicates a dark glossy monochrome colour all over, body and chassis, with silver wheels and side rods. The colour looks to be gloss black. Another builder's photo of a different brand new WR360 indicates a much lighter shade for the body, possibly grey, and the wheel rims seem to be painted white.  Photos of WR360s  from Tobruk indicate these were still a dark colour, no evidence of any 'desert camouflage' on any WR360. One website suggests that the WR360 on Panzerzug 29 (used in Rusia) was painted in a dark grey scheme with large blotches of green.

One website advises that initially these locos were painted a dark green & the running gear and lower areas were red, the green being a similar shade to DR rolling stock of the era. Once the war began they were painted grey, and from February 1943 they were painted dark yellow. It also advises that some locos in army use were repainted green, and some red

Why model kit manufacturers decided to make the C12 version (10 built before the war) instead of the C14 version (261 built up to 1944)  is a mystery..It may well be that there is little or no visible difference between the two types, at this stage there is only the report of 350mm difference in length. More research may resolve the issue.


ARMOURED TRAIN USE.  A WR360 locomotive was recorded as being used on an Armoured Train, being Panzerzug 29. There is published photographic evidence of this, though none I have seen for quite for some time. (There were pictures on a web site that have since been removed). This train (along with 5 other steam powered armoured trains) were all converted to russian broad gauge so that they could exploit the russian train network once Barbarossa commenced in June 1941. Panzerzug 29 was involved in the initial battle over the Bug River, and advanced into Russia during the summer and autumn of 1941. By January 1942 it was west of Kaluga, not far from Moscow, and was cut off in the russian winter counter offensive. Relief or withdrawl being impossible, it was blown up by its crew to prevent its capture, and was struck off the Order of Battle in February 1942.

Other german armoured trains did not have to be converted to russian (broad) gauge as the germans implemented a speedy plan on all conquered russian territory to change the russian gauge to german gauge, by  using local labour gangs to unbolt one rail and move it inwards, re affixing it at the german gauge.  This programme was completed as far as Karkhov in 1942. Captured russian armoured trains were sometimes kept in russian gauge for periods of time for use on unconverted sections of russian rail network, then later these trains were converted to german standard gauge.

(Sawodny in  Volume 1 of his Armoured Train book advised that Panzerzug 29 had a WR550 locomotive, he revised this in Volume 2 to a WR360. Only 3 WR550s were built, and all are accounted for in other places. In any event Panzerzug 29 was dieselised and in action before the 3 WR550s were built).

Note for modellers. Panzerzug 29 was an older type of armoured train, with different wagons and configuration to the later BP-42/44 Armoured Trains. The tank carrying cars were the older type carrying (ex french) Somua tanks, and no armoured wagons were in the consist. One source advises that Panzerzug 29 was hauled by a C12 model.

Panzerzug 72 which was a BP-42 type train, was split into two parts late in the war (being  named as 72a and 72b). At least one report has it that 72a was hauled by a diesel locomotive (72b evidently retained the armoured steam locomotive).

What type of diesel locomotive was on Panzerzug 72a is not known, though it can't have been a WR550 as all 3 are accounted for elsewhere, so Panzerzug 72a most likely was hauled by a WR360, these being the most common and powerful diesel shunting locomotives available.

Other wartime use. These locomotives were used to shunt and marshall military trains in major railway yards in countries where the german army was present. Wartime pictures exist of WR360s in Tobruk, where its reported 3 were unloaded & a photo exists of them being unloaded from a ship. These and other photos of WR360s in North Africa indicate these locomotives  still appear to be a dark colour, though somewhat lighter, possibly due to dust and/or the oxidizing effect of intense sunshine and heat. Locomotives photographed in North Africa have additional structures on the roof which may be to provide additional cooling for the motor. I think the box like structure over the exhaust may have been an additional safety measure for when these locomotives were working near inflammable or explosive materials.

Below are two pictures of WR360s said to be taken at Augsburg in August 1945. Note the vertical louvres can clearly be seen on one.


Post World War two, numbers of WR360 were used by the British Army in Germany, as well as in several other european countries.


Construction. I commenced building as per the instructions, with the axle box and spring assemblies for each side.


Next were the axles which joined the sides, and the brake piston


Then the wheels, brakes, counterweights, side rods & brake application frame were added (underneath and top views in next 2 photos)


Update 10 November 2012. I now have the major components assembled, but not yet joined, for ease of painting. I have also left off the front and rear headlamps, front handrails for both sides, driver's seat, windows, and drivers cab door. I have spent a lot of time researching colour schemes, but should get started soon. A small amount of tidying to a few areas, and the side cab door hand rails are cast on as solid lines, I need to cut these off and replace with brass wire handrails,.


Update Sunday 18 November 2012. Today the entire vehicle was given a base coat of Tamiya Black enamel.  I cut off the solid cast handrails on each side of the driver's cab and made brass handrails.]


Update Tuesday 20 November. The cabin and hood have had a spray of Humbrol matt enamel 94. I have applied the paint lighter to the edges and naturally shaded or darker areas. I feel this is important in small scale, as it helps the model to look more 3 dimensional, deepening naturally shaded arears  to reveal  & accentuate join lines and differences in depth. The reason this model is getting a base coat of dark yellow is that it will be used as the motive power for a late war armoured train.

 There is one confirmed case of one of these diesels being the motive power for Panzerzug 29 in 1941-42, and one reported case of a diesel being used on Panzerzug 72 when it was divided in 1944 into half trains renumbered as 72a and 72b.

Panzerzug 72b was with Army Group Center (later North) in East Prussia October 1944. Panzerzug 72a was in Krakau in November 1944 with Army Group A (later Centre).

Panzerzug 72a was the train reported to have a diesel locomotive. Its reasonable to suppose that more Panzerzugs may have desired to use diesel locomotives, as they did not produce the large clouds of steam and smoke that betrayed their location to enemy aircraft and ground troops. Diesels could also be used pairs for extra power with just one crew to operate both,  however shortage of diesel fuel was an ongoing problem for the germans, whereas coal was not in short supply, which ensured the coal powered steam locomotive's predominance. Another issue with the diesels would be the need for nearby workshop facilities, spare parts, and maintenance staff  specific to diesel locomotives needs.

I am making this model as Panzerzug 99, a real Panzerzug formed in April 1945. No documentation exists from that end stage of the war as to what Panzerzug 99 consisted of, its location or paint scheme, so while not a "Paper Panzerzug" no facts about it are known, so this leaves me creative freedom for paint schemes as well.


after the dark yellow had dried I then sprayed some Revell Matt 68 dark green blotches at random over the cabin and hood


then a few blotches of Humbrol Matt 113 enamel were added. The underframe and wheels were sprayed with Humbrol Matt Red 60.


Update Sunday 25 November. I have given the model a couple of washes of Burnt Umber oil paint diluted in thinners, to dirty it up and highlight some details. Diesel locomotives can be very grimey & I wanted this one to look like its been use for some time.  The paint job and build is still not finished nor are the major components joined. Still needs windows, rear door, front hand rails, and front and rear lights fitted.


The inside of the cab has been painted as per a description I found on the web, the lower part of the interior cab walls being black, the upper part being light grey. The floor being unpainted wood.


I have also decided to add some LEDs (Light Emitting Diodes) to add another dimension to the appearance. I have drilled out the kit marker lights (which are solid plastic) and inserted a 3mm LED. These will be wired to a battery concealed under the hood.

Below picture shows the kit light (temporarily attached on the left) and on the right a light drilled out with LED inserted. 


Update Sunday 9 December 2012. Hello ! It has been 2 weeks since the last update, events have conspired to keep me busy with other things. But back to modelling. I wired up the LEDs with a 9 volt battery. Quite crude but they work. Small round wrist watch batteries would be lighter and more elegant.  I tried to wire a 3rd LED (blue) to light up the cab interior, but evidently the 9 volt battery can only handle 2 lights.

The red LEDs work well - in fact too well, they are a bit too bright. I have given them a wash with diluted black enamel but still they are very bright. Pictures below, illustrating how the LEDs look from various angles and under various light conditions.


Update 19 December 2012. I have the locomotive finished, or close enough to it. Below are a few pictures.