Armageddon BP-44 Armoured Train Wagons
Hello
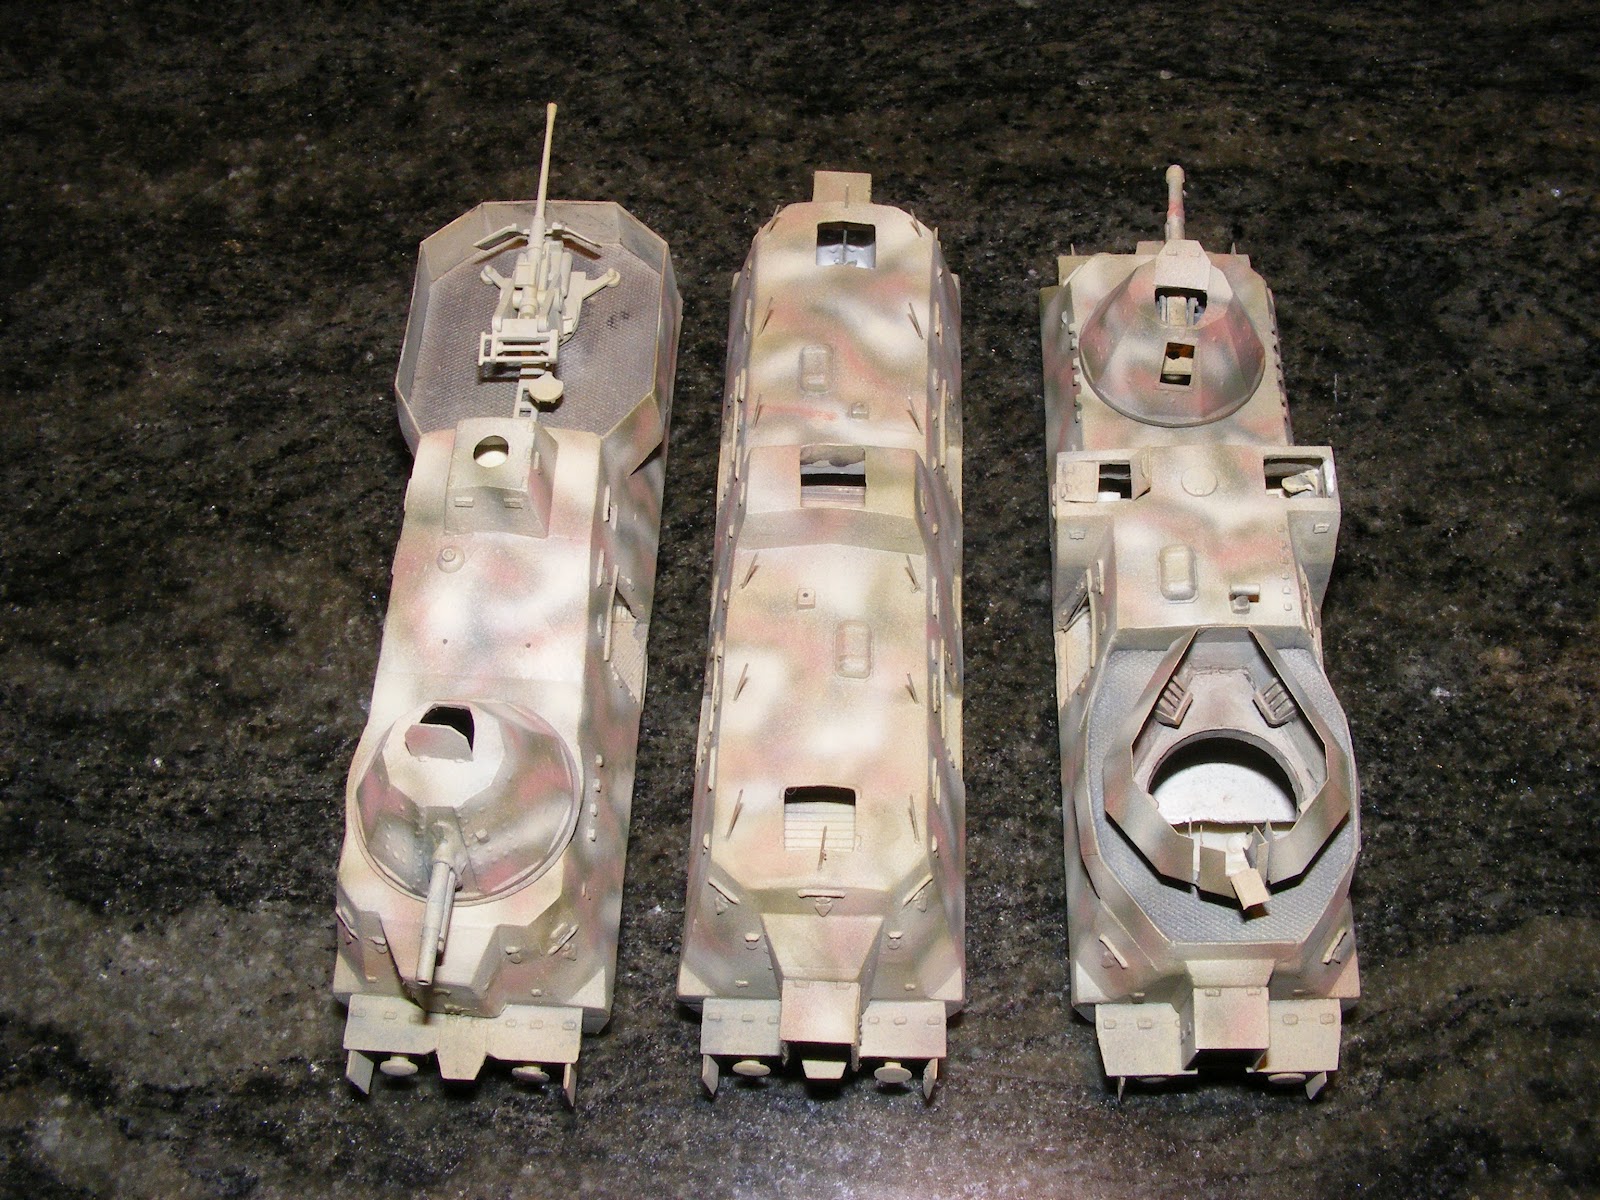
These BP-44 Armoured Train Wagons, have done a lot of work to improve them, and add I have added basic interior floors and walls, opened up numerous hatches and doors, made wire rungs and handles, and scratch built new cannons, obtained an etch Wirbelwind turret and brass barrels for the Flak gun, though I won't go into the details of what I did (unless anyone wants me too).
I have a basic paint job on all three wagons, though I will tone down the Kommandowagen a bit, the green and red brown is too bright at this stage, and the Wirbelwind Flakwagen camouflage may get more work yet.


Update 05 September 2012. After looking at the paint job on these wagons, I decided that I wanted them to look a bit more similar, so have reapplied a paint job to all of the above wagons. They still need a wash, and I think a light coat of yellow to mute the colours a bit more.
Below, wagons were resprayed with Tamiya enamel 'German Yellow', Red and Green were Humbol Enamel 113 and Revell Enamel 68

Update 09 September 2012. I still wasn't happy with the paint job on these wagons, so have done them again. Same paints as before, but totally different paint scheme. I wanted what I hope looks like a late war paint job, given the train is meant to be late war. Many different paint schemes were seen on these trains.


Update 12 September 2012. I was pretty happy with the paint job, but decided it was a bit too indistinct, so have used the same 3 colours as already used to make a slightly darker and more defined (but still very soft edged) paint scheme. To my knowledge the only colour pictures of BP-42/44 wagons were taken in late 1942 or early 1943, when the base coat was dark grey (same as the rest of the Wehrmacht) and the colour pictures also show winter whitewash over the dark grey. These were probably taken when the first six BP-42s were completed in late 1942 and were newsworthy enough to warrant some colour propaganda photographs and a story for the print media. When the Wehrmacht changed to dark yellow, armoured trains also seem to have been painted dark yellow, often with other colours sprayed over in various patterns. The new paint scheme I've done is similar to what is seen on some black and white photos, though what actual shades were sprayed on is anybody's guess, as none of the pictures from the war are in colour. As these trains were attached to Army Groups and conformed with the same base coats as applied to the army, it seems likely that red brown and green would have been commonly used as camouflage colours. Black and white period photos indicate at least two differing colours applied in a wide variety of patterns over a base coat.
Now I will let the paint job alone for awhile and start to add doors, more railings, hatch covers, other small details etc. These wagons will also get a wash of acrylic paint to bring out some details,


Update 23 October 2012. Some work has been done on the Flak Wagen. It has had a wash of Burnt Umber artists oil paint diluted in thinners. Decals have been applied, and another light wash of Citadel Devlan Mud has been applied. All angled edges have been high lighted with a light brushing of Lifecolor acrylic Dunkelgelb. I have made exit doors for the sides from plastic card, wire and stretched sprue for the door unlocking handles. Interior door detail was based on period photos showing the doors in the opened position. Next job is to make the top observation hatches.

Update 27 October 2012. I have now made and fitted all doors and hatch covers on this wagon. An aerial mount was made from stretched sprue and evergreen strip. Aerial itself is a bristle from a large paintbrush. Next job is finish the other flak wagon with the 37mm AA gun.

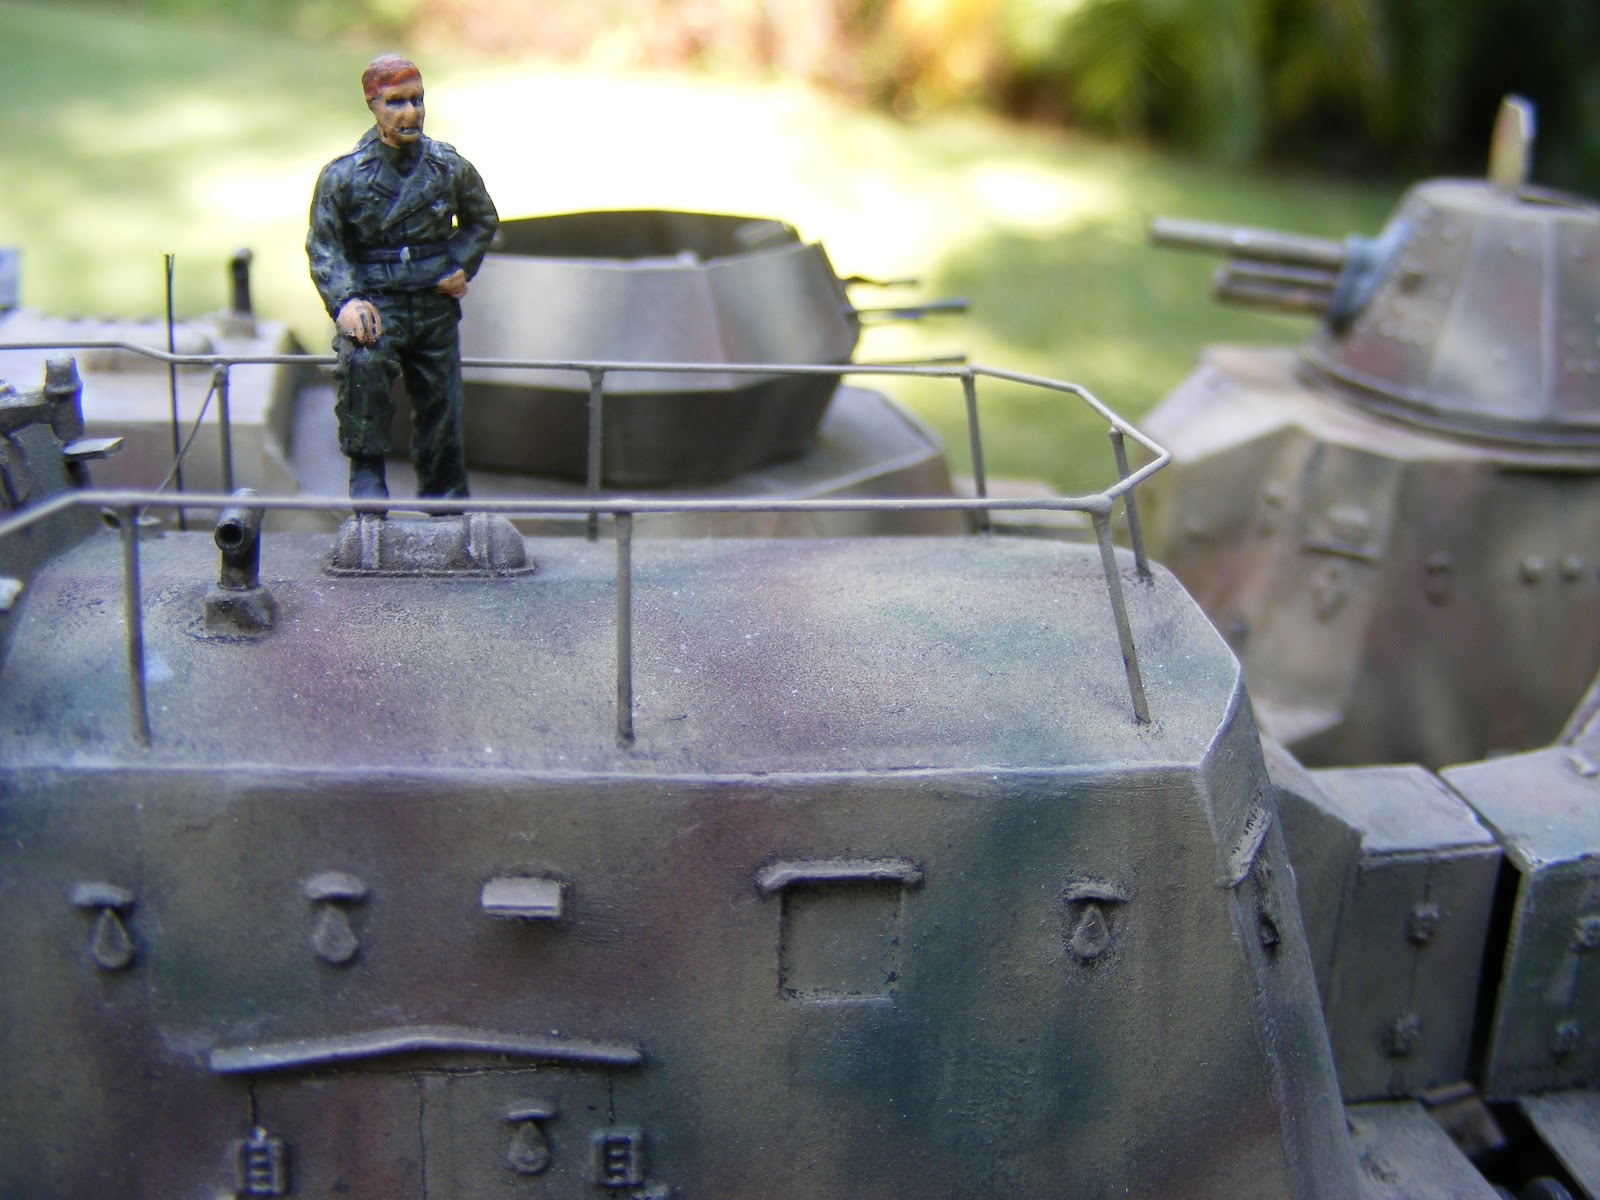
Update 18 December 2012. Its been a few weeks since the last update on the BP-44 build. I was working on some other builds as well as advancing this one, bit by bit. I now have the Kommandowagen mostly finished. I made the side doors from plastic card, to match period photos of these open doors. The inside door handles are made from stretched sprue. The hand rails on each side of each door opening are also stretched sprue. Grab handles inside each door are made from bent staples. Similar with the roof hatch doors. The lower chassis locking handles are made from stretched sprue. The large frame antenna was made from wire. Ideally one piece would have been nice, but very difficult to do, so I made the two sides and ends separately and attached them. The aerial mounting poles are made from the same wire, these were carefully mounted in the exact needed positions, angles and heights during the construction stage. The ventilator outlets were made from plastic rod. Next job is to paint all these open doors, period photos indicate they were a much lighter colour than the outside of the wagon, its a reasonable assumption they were painted the same off white colour as the interior of armoured vehicles, and that the lower chassis access hatches might be red primer on the inside.


Update 19 December. A few practice pictures.


Hello
These BP-44 Armoured Train Wagons, have done a lot of work to improve them, and add I have added basic interior floors and walls, opened up numerous hatches and doors, made wire rungs and handles, and scratch built new cannons, obtained an etch Wirbelwind turret and brass barrels for the Flak gun, though I won't go into the details of what I did (unless anyone wants me too).
I have a basic paint job on all three wagons, though I will tone down the Kommandowagen a bit, the green and red brown is too bright at this stage, and the Wirbelwind Flakwagen camouflage may get more work yet.


Update 05 September 2012. After looking at the paint job on these wagons, I decided that I wanted them to look a bit more similar, so have reapplied a paint job to all of the above wagons. They still need a wash, and I think a light coat of yellow to mute the colours a bit more.
Below, wagons were resprayed with Tamiya enamel 'German Yellow', Red and Green were Humbol Enamel 113 and Revell Enamel 68

Update 09 September 2012. I still wasn't happy with the paint job on these wagons, so have done them again. Same paints as before, but totally different paint scheme. I wanted what I hope looks like a late war paint job, given the train is meant to be late war. Many different paint schemes were seen on these trains.


Update 12 September 2012. I was pretty happy with the paint job, but decided it was a bit too indistinct, so have used the same 3 colours as already used to make a slightly darker and more defined (but still very soft edged) paint scheme. To my knowledge the only colour pictures of BP-42/44 wagons were taken in late 1942 or early 1943, when the base coat was dark grey (same as the rest of the Wehrmacht) and the colour pictures also show winter whitewash over the dark grey. These were probably taken when the first six BP-42s were completed in late 1942 and were newsworthy enough to warrant some colour propaganda photographs and a story for the print media. When the Wehrmacht changed to dark yellow, armoured trains also seem to have been painted dark yellow, often with other colours sprayed over in various patterns. The new paint scheme I've done is similar to what is seen on some black and white photos, though what actual shades were sprayed on is anybody's guess, as none of the pictures from the war are in colour. As these trains were attached to Army Groups and conformed with the same base coats as applied to the army, it seems likely that red brown and green would have been commonly used as camouflage colours. Black and white period photos indicate at least two differing colours applied in a wide variety of patterns over a base coat.
Now I will let the paint job alone for awhile and start to add doors, more railings, hatch covers, other small details etc. These wagons will also get a wash of acrylic paint to bring out some details,


Update 23 October 2012. Some work has been done on the Flak Wagen. It has had a wash of Burnt Umber artists oil paint diluted in thinners. Decals have been applied, and another light wash of Citadel Devlan Mud has been applied. All angled edges have been high lighted with a light brushing of Lifecolor acrylic Dunkelgelb. I have made exit doors for the sides from plastic card, wire and stretched sprue for the door unlocking handles. Interior door detail was based on period photos showing the doors in the opened position. Next job is to make the top observation hatches.
Update 27 October 2012. I have now made and fitted all doors and hatch covers on this wagon. An aerial mount was made from stretched sprue and evergreen strip. Aerial itself is a bristle from a large paintbrush. Next job is finish the other flak wagon with the 37mm AA gun.

Update 18 December 2012. Its been a few weeks since the last update on the BP-44 build. I was working on some other builds as well as advancing this one, bit by bit. I now have the Kommandowagen mostly finished. I made the side doors from plastic card, to match period photos of these open doors. The inside door handles are made from stretched sprue. The hand rails on each side of each door opening are also stretched sprue. Grab handles inside each door are made from bent staples. Similar with the roof hatch doors. The lower chassis locking handles are made from stretched sprue. The large frame antenna was made from wire. Ideally one piece would have been nice, but very difficult to do, so I made the two sides and ends separately and attached them. The aerial mounting poles are made from the same wire, these were carefully mounted in the exact needed positions, angles and heights during the construction stage. The ventilator outlets were made from plastic rod. Next job is to paint all these open doors, period photos indicate they were a much lighter colour than the outside of the wagon, its a reasonable assumption they were painted the same off white colour as the interior of armoured vehicles, and that the lower chassis access hatches might be red primer on the inside.


Update 19 December. A few practice pictures.


Hi Neil
ReplyDeleteI have to compliment you on your BP 44 builds, I am just in the process of starting mine, the Mach2 effort :-/.
needs a lot of TLC!!!
Hi Vlad.
ReplyDeleteThanks ! Yes the BP-44 takes a lot of work - I think its definitely the most difficult 72 scale kit on the market - its impossible to build it straight from the box, as many parts just don't fit. Still the basic sides ends and roof were straight and unwarped (at least in my kit, save a couple of small warps) so a decent enough build can be achieved, as long as its given lots of TLC (I second that !)
cheers
Neil
Hi . Looks like a really good build of the Mach 2 kit .You have done a great job . I got mine when it first came out and its been opened once . Its awful . Im about to start it and Im treating it as an aid to scratchbuilding . Like youve said it needs a lot of tlc and chocolate and good malt . I would like to see more of it and how you did it without breaking down . Im going to replace all the guns and tanks for a start . Does yours run or is it static
ReplyDeleteHi Martin. Thanks for the comments. The reason I persevered with the kit is it seems unlikely any other release of it in 1/72 scale will ever eventuate. Also each wagon is basically a box with angled sides and multiple angles on the ends. To me it meant that no matter how bad the fit, with enough sanding, then putty, then more sanding, that it was possible to get the basic shape about right and have no visible join lines where there should be none. And the wagons were unrivetted - another huge advantage. The rest of the moulded on details are just doors and view ports, which are mostly unaffected by sanding and putty. As you suggested replace everything you can - the 20mm flak cannons, & the T-38 tanks. The gun turrets were also OK (not great, but the cannon for them are throaways. Replacement cannons for the turrets are now easy to replace (I scratched mine). HaT makes russian and german howitzers of the type used in the gun turrets. All else to do is replace all the rungs and handles and frame antenna with bent wire. This does not run, its static. Best way to deal with it is one wagon at a time from start to finish (maybe pick an easier one such as the Kannonenwagen to get used to dealing with the work required. Hardest part for me was the Kommandowagen with its large wire frame aerial. First Kommandowagen took me hours to get the aerial bent right and attached, second Kommandowagen aerial took only a fraction of the time. Good luck with yours, feel free to contact me if you need advice or get stuck on any part of it. Cheers, Neil
ReplyDeleteThanks Neil. Ive just found and ordered the two tank transporter cars with tanks by UMMT. AS im replacing the tanks anyway I thought may as well try the transporters also . They could be used for earlir trains If I ever get that far .Yes its good there are no rivets apart from the engine and tenders .My example is such a bad fit ,I may just sand the lot off and rescribe all panels and hatches and redo the rivets . Some of the access panels are suspect . Ive noticed in your pictures you have thr Waldemar Trojca book and drawings . I think they will be indespensible . For some reason Im still not sure about Im going to make mine run on 18mm gauge tracks .. As soon as ive collected all the bits I will start , Two cars at a time to make sure I can remember what Ive done to one Ill do to the other . Thanks for the offer of help . I may take you up on that .Cheers Martin
DeleteHi Martin. I also have the UMMT Tank Transporter built. If you compare the Mach II kit to the UMMT they are almost identical in size. The UMMT kit has better casting and goes together easier, as you'd expect. In my train pictures its the Mach II transporter with the UMMT T-38. Yes the Trojca book with plans is very very useful. There are some small differences in hatch positions between the Trojca book and this kit. There were some similar differences between BP-42 wagons, so no need to change vision port and hatch positions unless you want to. There are pictures on the web of at least one other Mach II BP-44 converted to 18mm track, if you are prepared to put the work in to make it run, I don't see any reason why not. With my Mach II, I test fit the roof, sides and ends first, ensuring they were square and level along the bottom edge, sanding and resanding, and holding the parts in place to test fit with big lumps of Blu-Tack. When it was about right I then test fit to the base to check angles, and that it didnt overlap. I found that the bodies overlap the base at each end by a couple of millimetres, but its easy to trace the end shape onto a piece of plastic card and glue it. I should have some pictures I can post of some of the assembly if it might help. cheers, Neil
ReplyDeleteThanks for the encouragement Neil . Ive just had it all out on the kitchen table cutting out most of the scrap parts and Im wondering what Im letting myself in for , So I need all I can get .Also just ordered some more bit off the web . Thinking of doing a blog on . Is that easy enought to set up ?never done that before .All help is welcome if yuor willing to post pictures .I dont want to take up any of youyr modelling time , you seem quite prolific . Im rather slower myself . THanks again Neil .Martin
ReplyDeleteHi Martin. If you are going to make your train as a runner, that the first thing you will need to sort. I made mine static so can't give you any advice on that. What I can help with is getting the wagons made. How I started was to cut out the 6 main parts of a wagon, being the sides, ends, roof and base. When you test join them you will see that that they just don't fit. This is where you need to carve and sand the inside edges of the plastic so that its thinner and angled inwards. Carve as much as you can without damaging the outer surface. Test fit often and you will gradually see that the fit becomes better and better. I recall the roof in particular got a lot of thinning, the edge was very thin at the end, but main thing was that I got a good even almost invisible join line with the sides and ends, after a lot of effort. Use blobs of blu-tack to temporarily hold two parts together while you test fit a third part. I like to be sure that more than two parts are a good fit before committing to glue. I will find and post any progress pics I have during the next week. A blog is easy to create, on a Google page, just click the down arrow and you will see the menu item "Blogger", just click that and follow the prompts to create your own blog. Good luck, cheers, Neil
ReplyDeleteMartin, when I built the first half of the BP-44 armoured train I put a lot of progress pics on the below site, check it out, it may be helpful http://armorama.com/modules.php?op=modload&name=SquawkBox&file=index&req=viewtopic&topic_id=173380&ord=&page=1
ReplyDeletecheers, neil
re my above post, the link to the site is not 'live' you will need to copy the web address, and paste it into a web browser, cheers, Neil
ReplyDeleteThanks neil . Found the link . Very useful ,its all sinking in .Martin
ReplyDeleteHi all ...i'm encouraged by all the comments about the build as my other half bought me the complete BP44 train and i want to make mine a worker....
ReplyDeleteThe kit itself needs lots of love and wire and resin and replacements barrels
I have the ummt car and 38t as well and the resin car as well and am planning on making a working draisine -trolley train
any idea where euro chain links and hooks can be purchased ??
ta inadvance
Hi David.
ReplyDeletesorry about the slow reply, have been indisposed for some time.
it is possible to make the BP-44 a worker, if you put the time into it.
Re working links. I have found two model railway types that are more or less close enough to the real thing. There may be better out there, I'd be glad to know, if anyone knows of other choices. Getting actual 1/72 scale is unlikely, I think HO or OO is close enough, particularly given the couplings are hidden by armoured skirts and a walkway plate, when joined up.
What I have obtained is from Austral Model Craft, a model railway shop in Mt Gravavtt (south side of Brisbane). Both types are made by Romford Models. You can probably get them cheaper online.
One is called L9610 HO/OO screw coupling (one pair in the bag)
The other is called One Pair OO 3 Link couplings sprung. (one pair in the bag)
The first is more expensive ($15.95), contains hooks links and screw couplings that can actually be wound tighter, like the real thing.
The second has just the hooks and links, and was about half the price of the first (lost the price tag.
Might be an idea to obtain one of each to see what will work best on these wagons. I simply made non working links from 0.30 mm wire, as mine are purely cosmetic, and except for the ends are mainly hidden from view
any more info needed let me know
cheers
Neil
a wonder work and and realistic photos ! bravo from italy cheers army56
ReplyDelete