Saturday, June 30, 2012

UMMT T-26-1E light tank

UMMT kit 402, T-26-1E (Ehkrenami). This was a T-26-1 with additional armour added to the hull and turret.

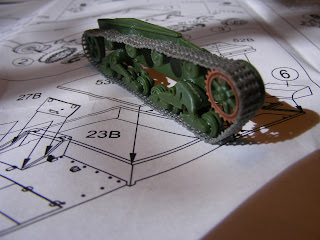
Construction Comments. This kit goes together without any fit issues.The track is individual link and length, which is good, but it is very delicately moulded and rather firmly attached to its sprue, so a lot of care is needed to remove the individual lengths without damaging them. I still managed to damage a few. I also took the step of wrapping the lengths around the sprockets as I found this much easier than trying to neatly place the individual lengths around the front and rear sprocket. I then glued the individual links into longer lengths & attached them, making a sag for the top run of track. The metal etch armour comes 'pre-creased' which makes it very esasy to bend into the right shape. Liquid superglue was brushed on to attach these to the plastic.

A most enjoyable build, other than the slight frustration of detaching the tiny individual links from the sprue.


UM Panzertraeger Car with T-38 tank


UM Kit 259 Tank Carrier with PZ.Kpfw 38(t). These were attached to armoured trains for extra protection and to give the infantry mobile armoured support when they had to leave the train.


Construction Comments Tank Carrier. No major issues with building the tank carrier, though it helps if you have clear photos or plans to work out exactly where to place the hinged door parts. The door can be placed in the up or down position, though the difference between the two positions is only a few millimetres. With a little extra work the door could easily be made to hinge. Only missing piece is a hand brake wheel for the side, I had a nice etch one to add.  I also made hinges for the back plate, from card & rod. Only basic german crosses come as decals, I added Armageddon decals to my build, though they are not really needed, wartime pictures don't often show these markings, as they were frequently painted over with camouflage, and whitewashed in winter 


Construction Comments T-38 tank. The tank supplied in the kit is the standard UM T-38. Its a very nice build. The only thing absent on it is the rivets on the back engine plate. I made some using my water filter balls (one filter supplies thousands), drilling holes to insert the balls into.


Other Comments. This kit is very much better than what Armageddon Mach 2 supply in their armoured train kit. These tank carrier wagons were also added to Heavy Scout trains (UM kits 255 & 256 - but not to light scout trains such as UM kit 257).


SG-122 russian tank


Military Wheels Kit 7253 SG-122. The SG-122 was a russian experiment to mount a large calibre gun on captured German Panzer III and Stug III chassis. Possibly as many as 20 were built. It was not a success, as the chassis was overloaded.  Also the development of the SU series of self propelled guns meant no need for further development on captured chassis.

Construction Comments. Very poor fit of lower and upper hulls, the lower hull being too short, much putty and sanding needed, also of the lower hull sides, to allow the upper plate to join. The box like structure that houses the gun also had some fit issues. General casting of road wheels and track is not the best, but looks acceptable, once all painted and done.

Other comments. No anti slip tread on the mudguards, I glued on embossed cigarette packet foil. I also added lift hooks made from bent wire. No photos of this vehicle exist, but it is mentioned in official soviet war time documents and a set of blue prints for it can be found on the web. 


Friday, June 29, 2012

Porsche Tiger I

Dragon Kit 7209 Sd Kfz 181 VI (p) Porsche Tiger


Construction comments. Two things stand out on this kit - no zimmerit and no tread plate on the mudguards, though period photos show this tank had both, when in operational use.
 I made a kind of zimmerit look with a sharpened micro screwdriver, and used embossed cigarette packet foil for the mudguards as can be seen in the below pictures. I also scraped off the moulded on tow cables and tools and made my own cables from braided wire, tool rack from etch, and tools from the spares box. I also added extra shackles to the front, as per period photos of this tank, and replaced the cupola with a Revell Tiger part, as advice and photos indicate its more accurate. Hull MG was left off as it isn't shown in place in period photos. Other than my changes the kit was a straightforward build, but if you build this kit, don't be like me, and get the drive sprockets mixed up - I noticed & replaced mine, but its rework better avoided.


UMMT PL-43 Armoured Rail Car

UMMT kit UM622 PL-43 Armored car with T-34/76 turret.

Construction Comments. No fit problems with the lower and upper hull, all polystyrene components fit well. There is a lot of metal etch in this kit. (I hesitate to call it 'brass' etch as it seems to be copper). It doesn't take long to get used to using the etch, though some foot and hand rungs are undoubtedly better replaced with wire. Makes up into a great looking wagon. Couplers are the only drawback.

Other Comments.No doors or hatches open, other than the T-34 turret hatch. The wheels can barely be seen, and as all my rail builds are intended as static models I have sanded the wheel flanges down to a scale depth. Anyone considering making this (or any UM or UMMT rail kit) into a moving wagon for a model railway needs to know that this model is scaled to russian broad gauge, and HO railway track is much to narrow, they would need to replace the wheels and axle boxes with model railway components. .


UMMT OB-3 Armoured Rail Car

UMMT kit OB-3 Armored Car with T-26(1933) Double Turrets.

Construction Comments. The T-26 turrets supplied in the kit lack rivets that were in place on these type of turrets. I used water filter balls as rivets (drilling a depression to insert them into), which is a slow but generally neat way to get the needed rivet heads. There were some bad fit issues between upper and lower hull, as the sides were not straight, the sides were slightly concave, which made joining the upper and lower hull halves neatly very difficult. I used filler to cover the worst of the joins.

General Comments. A lot of metal etch supplied in the kit. Though etch is not universally popular, it doesn't take long to get used to it, just using a knife blade and tweezers is sufficient to fold and manipulate the etch parts. Liquid super glue used to affix etch to plastic. For me the etch railway couplers at each end of the wagon are very unconvincing looking, and I have left them off, pending making or finding suitable replacements. Still makes up into a great looking subject.


Thursday, June 28, 2012

Attack T-97 Staff Car

 Attack kit 72811, Tatra T-97 Staff Car. These are czech manufactured cars that were in use by the german army during World War 2.

Comments on Construction. Not many parts in this kit and no construction issues. Casting quite good for such a small vehicle. I kept the body shell separate for painting and window application purposes, not joining it the floor pan until all painting & detailing was completed. Only addition was a home made windscreen wiper. I also countersunk the headlight area and painted it silver to give it some depth & used a drop of  Testor's Window Maker to make the headlight glass.


Other Comments. I originally painted this in 3 colour camouflage, but decided that gloss black would look better, so paint stripped it with Oven Cleaner & started again. This is one of my favourite small vehicles. Figures on base are Prieser and Caesar.


Trumpeter KV-1 & KV2 tanks

Trumpeter Kit KV1 & KV2 kits 7266, 7230 & 7232 


Trumpeter Kit 7266 German Pz. kpfw KV-2 754(r) tank. This kit represents a captured russian KV-2 in german service.

Comments on Construction. No issues  with the build, all quite straightforward and easy. Parts specific to this captured version are a german Panzer III cupola on the turret roof and a rack for extra ammunition on the rear of the hull. Also a rack and set of jerry cans. Some detail has been simplified.

Other comments. The foot rungs are cast as solid tabs on the turret - I cut these off and replaced them with bent wire, drilling tiny holes with a micro drill bit to affix them. I also made what appear to be 'track hangers' on the turret sides by bending wire, and affixing the same way as the rungs, as photos show these were added to the turret sides. Also in the period pictures, lengths of tow cable are wound around these hangers.I used the rubber tow cables that come in the kit, looping them around the hangers. The tracks are a single length of rubber. To make them a little longer to obtain some realistic looking track sag, you can gently stretch the segments at intervals. I grasp the track with both thumbs and forefingers, side by side and gently pull about a millimetre or so until I feel the track give a little. The key here is to be very gentle, or you will stretch the track out of shape or worse, tear it. With gentle pressure at regular intervals along its length, you can add a few millimetres to the length without changing its appearance. Slit view ports were made on each side of the turret with a micro screw driver blade, sharpened with a file, to make a neat rectangular hole.


While on the KV series I may as well add the others I have, also from Trumpeter. Many soviet tanks fell into german hands from 1941 onwards, and when they were in running condition, and as long as they could be kept running, these were always put to use.


Next is Trumpeter kit 7230 KV-1E Ehkranami tank. The 'Ehkranami' refers to the additional armour bolted to the turret for improved protection. These modifications were reportedly done in a Leningrad factory.


Comments on Construction. As with Trumpeter's KV-2, this was a straight forward build, that presented no complications or problems.


Other comments. I built this one to match a period photo of one of these in german hands. The crew hatches can be modelled open which was a big help. I also needed to remove the lid off one of the equipment boxes on the mudguard, which then involved thinning the sides of the box, and I also needed to buckle the mudguard to match the picture. Final touch was to replicate the impact damage on the turret armour and find some decals for the turret. This conversion was easy and a lot of fun to do. 


And now another KV-1, another from Trumpeter, kit 7232 KV-1 Model 1941. Again this one built from a photo of one in german hands, with the unusual difference that it has no front sprocket, and damage that suggests a mine, and has Panzer III or IV tracks on it. The claim is that this one was used as airfield defence by the germans, the makeshift tracks allowing it to be towed, as lacking a drive sprocket it could not be driven.


Comments on Construction. Again, as above, these Trumpeter kits are quite easy to put together. The tracks were donated from a Trumpeter Stug.


Other Comments. As with last build I had to open up a tool box, and have the lid open, the inside walls of the box were thinned & a lid made from plastic card. The build also needed to have a rear engine hatch open, which comes moulded shut. I drilled this out & used the driver's hatch, as the underside detail would be visible from the rear, and made a new drivers hatch from card. I also draped a tow cable over the back engine deck as per the original photo. The damaged mudguard was made by cutting away the front of the guard from the body, then twisting and bending it into a similar shape, & sanding it to make it thinner. The mudguard supports are solidly cast on, with all the KV bodies, I cut these off and replaced with slender evergreen rod, to make them look more like the real thing. The axle for the sprocket was a piece of evergreen rod.


UM Heavy & Light Armoured Draisines


UM Kit 255 & 257 - Heavy Armored ArtilleryCar, & Light Reconnaissance Car


Comments on Construction. Some minor fit issues with the sides and ends but nothing major. My kit had a  flaw in the casting of one side which was easy to fill. Other than that flaw the casting is quite crisp. At least one other report of poorly cast pieces in one of these kits has also been advised, hopefully no others are still in circulation

Other Comments. All doors and hatches are cast shut. I added some rungs made from wire onto the sides, door handles, and grab handles on the turret roof.

Its reported that 6 heavy scout trains were operational late in the war, each had 2 of these artillery cars, as well as infantry cars and command cars which are basically the same hull, minus the Panzer III turret. These heavy scout trains also had anti-aircraft wagons and Panzertraeger cars with demountable Panzer T-38s attached.


UM Kit 257 - Light Reconnaissance Car

Comments on Construction. No fit issues. Frame aerial needed a scrape to remove a cast line around its edges. Kit lacks the double row of rivets around the bottom of the hull, and the headlight ports at each end, and door handles. These were all added in the build, and an aftermarket set with these parts is available for those not wishing to make their own. I also cut open some of the view ports

Other Comments. Four light scout trains were operational late in the war. Each train was made up of ten of these cars. The trains could be split into smaller sections, the minimum being two cars (for mutual protection & mobility should one break down or become disabled). The cars carried also carried a small infantry component.


Wednesday, June 27, 2012

UMMT D-37 & DT-45 Armoured Draisines

UMmt Kit um601 & 602 - Armored Self-Propelled Railroadcar D-37 with D-38 Turret & Armored Self propelled Railroad car DT-45


Comments on Construction. This was a straightforward build. It has metal etch re-railers that attach to the lower hull which are slightly fiddly. These can be left off, which would result in quite a quick build.

Other Comments. The hull should have rivets around the side doors and side gun ports, but doesn't, and also lacks door handles. These were added. Comes with a basic length of track (not the Hobbyboss track in below pictures)


UMmt Kit um602 - Armored Self-Propelled Railroadcar DT-45


Comments on Construction. This kit is basically the same as the D-37, but with a different turret, and also has a frame aerial. Being the same hull, this kit also lacks rivets around the doors & side gun ports. The early T-26 turret supplied in the kit also lacks rivets. The kit comes with a piece of wire bent approximately into a horse shoe shape for the aerial, and the supports for it are metal etch. Again no doors or hatches are separate, all are cast closed.


Other comments. I decided to add all needed rivets, which was a time consuming undertaking. I used the tiny balls found in water filter units (these water filter units can be bought at any hardware store). To place the "rivets" I countersunk holes with a micro drill bit, then dampened a 000 paintbrush with water, to pick up a water ball then placed it into the hole. The real turret has rivets of varying sizes, the water filter also contains various random sizes of water filter balls to choose from. When a row was completed I would brush over a light diluted coating of clear acrylic to seal them in place. The clear acrylic coating is very thin, and is invisible once dried. I discarded the etch horse shoe supports as they are very two dimensional, and made some from insulated single strand wire, which closely match the real appearance of these supports. Also used my own 0.44 wire. As a final touch I opened up the covers for the concealed lights, placing lights inside the hull.