Dragon kit 7421 Heavy Uniform Vehicle conversion to Ambulance
Hello. I found about 20 period photos on the web of Horch PKW Type 40s converted to an Ambulance. At least one photo shows a row of these vehicles, so it cannot have been a 'one off' conversion. Photos show some minor variations such as roof rack and a roof light, drivers side window, etc, but photos also reveal two different types of conversion, the less commonly photographed version has one side window, and the wheel arch for the spare wheel is higher. No scale plans are known to me of either variant. Pictures below show the more commonly photographed variant.
 ]
]


Conversion comments. The ambulance is based on Dragon's Horch Type 40, so any one of Dragon's Horch kits may be used. My basis for this conversion came from kit 7421, being '2 in a box', the other was built as a standard Horch. I did not take many 'in progress' pictures, as I hadn't intended to write up a build description. Will be sure to be more thorough with future conversions.
To keep the conversion simple I went with the more commonly photographed type.
The supplied kit body can be assembled as per the instructions, but I decided not to build the suspension or add any other parts until I had the ambulance conversion built, so that I could handle the body without worrying about breakages to any of those parts.
First I cut the raised detail off the rear, and then sanded the rear smooth. The rear will be based on one photo that shows the vehicle had a pair of large rectangular rear doors, with windows, so the angular doors (which I have discussed with in an 'out of the box' build of a Horch Type 40 had to go.

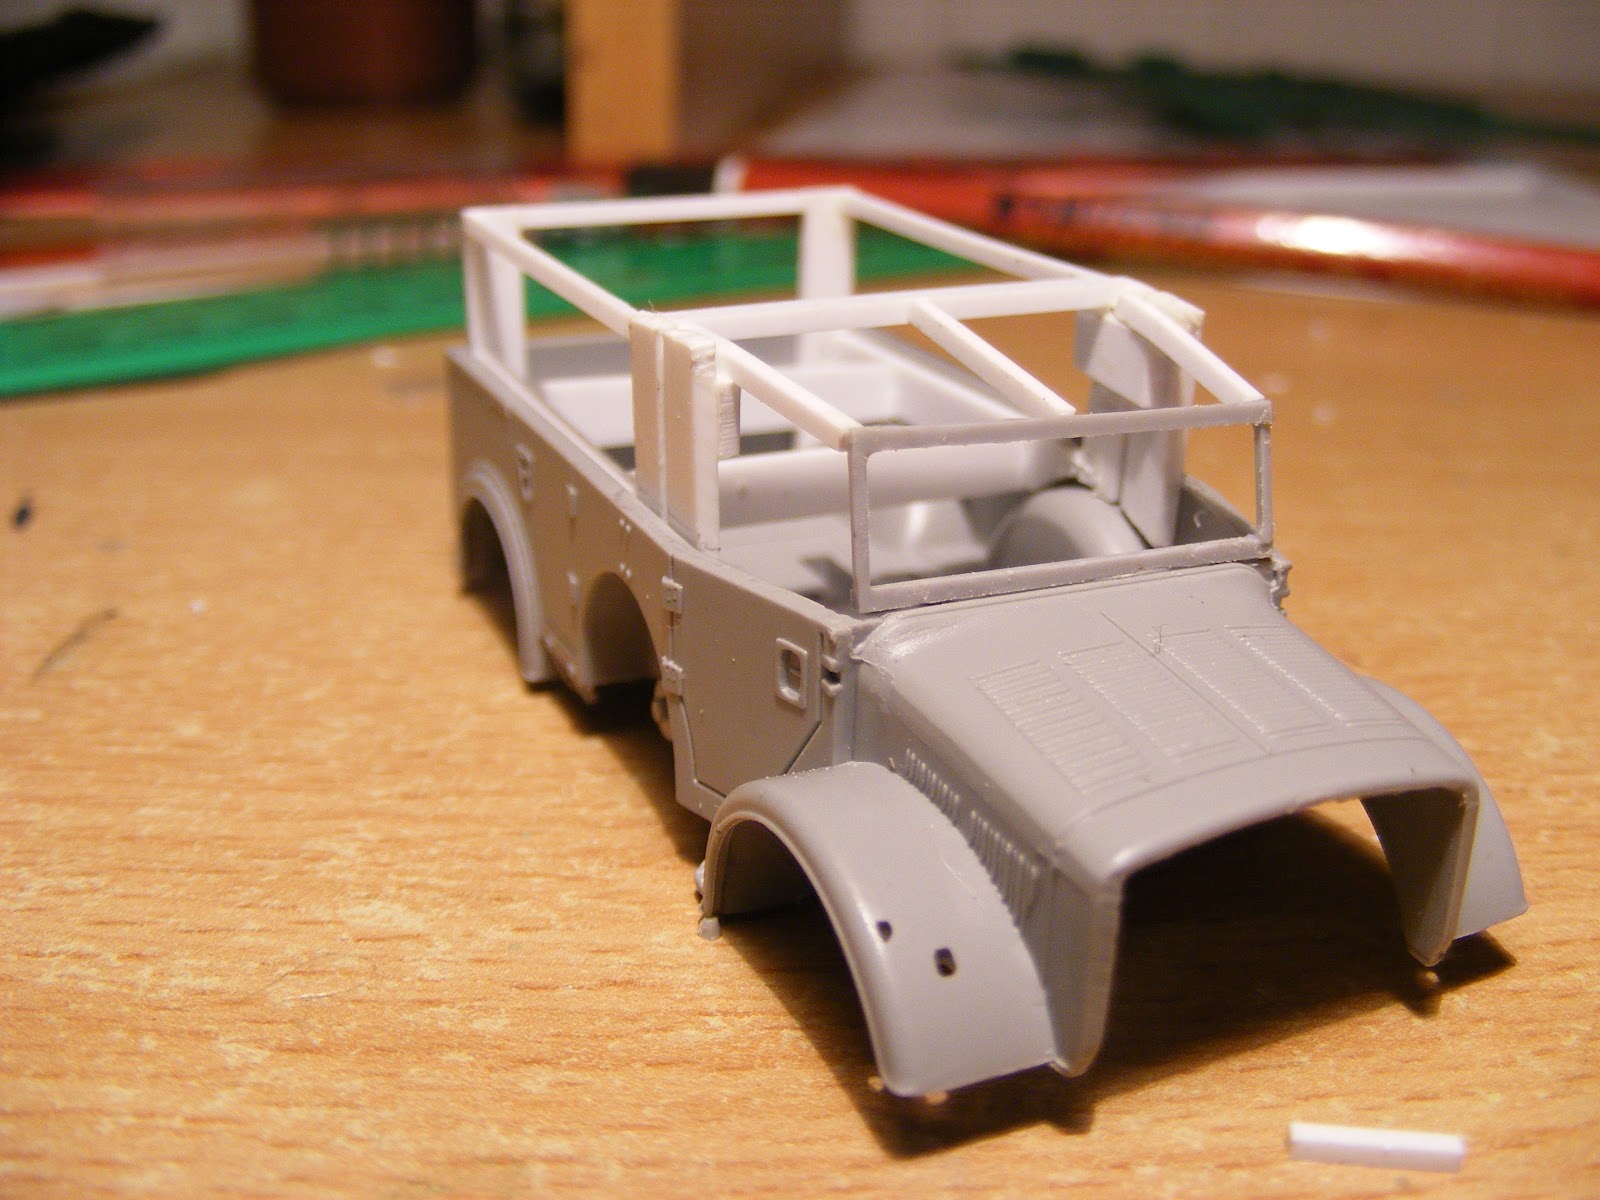
The next job was to make a basic frame to fit the sides, rear and roof top to. This was made from spare evergreen lengths, I happened to have 1 x1.5 mm and 1.5 x 2.5 mm strips so used these, they made a firm frame that would not easily break with a lot of handling. I did not glue this into the vehicle, I kept it as a separate unit that was a snug fit, so that I could take it out and work on it & modify it as needed.
I found a window frame in the spares box so attached it, which meant cutting off the lugs that hold the kit windscreen, from the body. I estimated the kit windscreen to be too small for the ambulance. Note a slight downward angle from the drivers side windows to the windscreen, as per photos, and the roof also tapers inwards slightly from the cab doors to the windscreen, so the frame was built to match the angle of the cab doors.


Happy with the frame, I then turned my attention to the sides of the kit body.
The rear passenger door on the ambulance opens the opposite way to what is moulded on the kit, so no choice except to again cut off the raised detail on the sides and make new sides from very thin plastic card. I decided the easiest way was to use 20 thou plastic card to make 4 side panels - drivers door, wheel arch area, rear door, rear panel for each side, and affixed
Then I inserted the frame into the body and made a single upper panel for each side cut to shape to match the side doors and windows.


At this stage I assessed my replacement front window to be too small so removed it and made a new one from 1.0 x 1.0 mm square rod, and a rear panel was made from 20 thou card was scribed with door outlines and windows apertures were cut and attached to this frame

In the below picture the assembly is test fit to the body to check how everything mates up.


Next job was to cut a roof to shape. I scored a line where it angles down, to allow it to be bent. I then added green stuff putty to build up the entire roof surface so that it was slightly rounded. This required sanding with fine grit paper, to get the shape right, and additional filler where slight cracks appeared, I used Testors Contour Putty for that, in progress shot of that stage below.

The next issue to address was the rear mudguards, these needed to protrude as per the period photos. I found old ESCI Opel Blitz rear mudguards, cut lengthwise almost exactly match the existing mudguards shape and size, with a little sanding to tidy them up, they were attached, then filler and sanding applied to disguise the join. I also added a thin strip of evergreen around the spare wheel arch to form a slight lip.

The kit parts were now added to the body, and hinges and door handles made from wire and plastic card were added. No interior detail behind the drivers cabin was added, as can't be seen and how it should look is unknown. I also did a little pre-shading with grey enamel paint.

Then a light base coat of Floquill enamel was applied, (Concrete) which to my eye creates a shade that closely resembles the colour seen in late war colour photos and film of german vehicles. Light camo patches of green were applied in Lifecolor acrylic. The ambulance upper part was painted with Model Master Light Gray enamel, as white would be too bright.

Next was check of final fit of the ambulance upper body & another light sand to smooth the roof. The windscreen frame was removed as it was a little imperfect, and a new one was built .
Dust was lightly sprayed all over but heaviest on the lower areas, using diluted Model Master Dark Tan enamel. Detail was picked out with Citadel Badab Black acrylic wash.
The roof light was from the spares box, being a headlight from an ESCI Sd Kfz 250.


Final kit parts were added, & foot step made from wire was added below each side rear door. The front tow hooks in the kit are a bit thick, so these can be replaced from spares or sanded carefully with jeweller's files to make them slimmer. The roof was given a final coat of Model Master enamel, & clear plastic sheet was used for window glass, window wipers were metal etch from Ilian Filipov, and the decals were supplied by Francois Gousse, two braille scale modellers who kindly sent these to me.


Hello. I found about 20 period photos on the web of Horch PKW Type 40s converted to an Ambulance. At least one photo shows a row of these vehicles, so it cannot have been a 'one off' conversion. Photos show some minor variations such as roof rack and a roof light, drivers side window, etc, but photos also reveal two different types of conversion, the less commonly photographed version has one side window, and the wheel arch for the spare wheel is higher. No scale plans are known to me of either variant. Pictures below show the more commonly photographed variant.
 ]
]


Conversion comments. The ambulance is based on Dragon's Horch Type 40, so any one of Dragon's Horch kits may be used. My basis for this conversion came from kit 7421, being '2 in a box', the other was built as a standard Horch. I did not take many 'in progress' pictures, as I hadn't intended to write up a build description. Will be sure to be more thorough with future conversions.
To keep the conversion simple I went with the more commonly photographed type.
The supplied kit body can be assembled as per the instructions, but I decided not to build the suspension or add any other parts until I had the ambulance conversion built, so that I could handle the body without worrying about breakages to any of those parts.
First I cut the raised detail off the rear, and then sanded the rear smooth. The rear will be based on one photo that shows the vehicle had a pair of large rectangular rear doors, with windows, so the angular doors (which I have discussed with in an 'out of the box' build of a Horch Type 40 had to go.

The next job was to make a basic frame to fit the sides, rear and roof top to. This was made from spare evergreen lengths, I happened to have 1 x1.5 mm and 1.5 x 2.5 mm strips so used these, they made a firm frame that would not easily break with a lot of handling. I did not glue this into the vehicle, I kept it as a separate unit that was a snug fit, so that I could take it out and work on it & modify it as needed.
I found a window frame in the spares box so attached it, which meant cutting off the lugs that hold the kit windscreen, from the body. I estimated the kit windscreen to be too small for the ambulance. Note a slight downward angle from the drivers side windows to the windscreen, as per photos, and the roof also tapers inwards slightly from the cab doors to the windscreen, so the frame was built to match the angle of the cab doors.


The rear passenger door on the ambulance opens the opposite way to what is moulded on the kit, so no choice except to again cut off the raised detail on the sides and make new sides from very thin plastic card. I decided the easiest way was to use 20 thou plastic card to make 4 side panels - drivers door, wheel arch area, rear door, rear panel for each side, and affixed
Then I inserted the frame into the body and made a single upper panel for each side cut to shape to match the side doors and windows.


At this stage I assessed my replacement front window to be too small so removed it and made a new one from 1.0 x 1.0 mm square rod, and a rear panel was made from 20 thou card was scribed with door outlines and windows apertures were cut and attached to this frame

In the below picture the assembly is test fit to the body to check how everything mates up.


The next issue to address was the rear mudguards, these needed to protrude as per the period photos. I found old ESCI Opel Blitz rear mudguards, cut lengthwise almost exactly match the existing mudguards shape and size, with a little sanding to tidy them up, they were attached, then filler and sanding applied to disguise the join. I also added a thin strip of evergreen around the spare wheel arch to form a slight lip.


Then a light base coat of Floquill enamel was applied, (Concrete) which to my eye creates a shade that closely resembles the colour seen in late war colour photos and film of german vehicles. Light camo patches of green were applied in Lifecolor acrylic. The ambulance upper part was painted with Model Master Light Gray enamel, as white would be too bright.

Next was check of final fit of the ambulance upper body & another light sand to smooth the roof. The windscreen frame was removed as it was a little imperfect, and a new one was built .
Dust was lightly sprayed all over but heaviest on the lower areas, using diluted Model Master Dark Tan enamel. Detail was picked out with Citadel Badab Black acrylic wash.
The roof light was from the spares box, being a headlight from an ESCI Sd Kfz 250.


Final kit parts were added, & foot step made from wire was added below each side rear door. The front tow hooks in the kit are a bit thick, so these can be replaced from spares or sanded carefully with jeweller's files to make them slimmer. The roof was given a final coat of Model Master enamel, & clear plastic sheet was used for window glass, window wipers were metal etch from Ilian Filipov, and the decals were supplied by Francois Gousse, two braille scale modellers who kindly sent these to me.


nice creativity ! it can make an awareness to the people.
ReplyDeleteAmbulance Conversion Dubai UAE
Great job Neil. Are you still doing this blog? No posts since 2013... que past?
ReplyDelete