MACO kit 7208 Flakpanzer IV "Kugelblitz" (2 x 3cm M.K.103 Pz)
I was so interested in this kit, that as soon as I saw it was released, I ordered one, which took about 8 weeks to arrive at my home. I had some spare time on the day it arrived, so decided to start it immediately. This is one of those models that I thought would never be made in 72 scale, and I am pleased that the release of this kit proves me wrong
About the actual tank. This was a late war build, according to 'The Encyclopaedia of German Tanks of WW2' (by Chamberlain, Doyle, Jentz) and was instigated by General Guderian who demanded better defence against fighter bombers. The 3cm Doppelflak 303 (Dual AA mount) was the same as was planned for U-Boat defence, but was not actually used. The book advises two Flakpanzer IV Kugelblitz were made, delivered in February 1945, and no known combat history for these. Other sources on the web advise that 5 were built and delivered December 1944, and at least one was destroyed in combat against american armour in April 1945.
The kit. This kit comes with 4 sprues, set of instructions and painting guide, and a set of decals. 3 of the sprues are Revell's Panzer IV, and one sprue is MACOs, containing the parts to make the Flakpanzer. The box is perhaps the strongest I've seen, which is a good thing, as though my box was a bit flattened from its trip across the world, no parts were damaged.
The Build. I have never built the Revell Panzer IV, so was pleasantly surprised that everything went together so well. I have not built any Revell kit for many years, so was not sure what to expect, though I had heard good things about their Panzer IV.
The Maco parts have been engineered to a very high degree, and fit in nicely with the Revell parts.
The Instructions - these are quite clear & include a page with a cloured painting guide, but there is one thing to be aware of - the diagrams show to attach the tracks in what is normally considered the wrong direction. Those familiar with Panzer IVs will pick this up straight away, however I followed the instructions and as a result the tracks are on in what is usually considered the reverse direction.
Though period photos exist of Panzer IVs with tracks attached in the reverse direction, the vast majority of Panzer IVs were photographed with their tracks on in the forward direction. Its up to the modeller to assemble it any way they wish, but be aware that the instructions direct the modeller to attach the tracks in reverse direction. Below are scans from the Maco and Revell instructions which illustrate the difference. Click the below to get a larger view;


Below are sprue shots, the MACO replacements being in pale yellow

Below is a close up of the MACO spue, all other parts are standard Revell

Chassis and road wheels constructed with no problems, no flash or cast lines to remove

Perhaps the hardest part of the construction, removing the track pieces and affixing them. I glue the individual links to make runs of 7-8 lengths BEFORE attempting to affix them, and let them semi dry before bending them around the front sprocket or rear idler for a neat and clean result. I don't recommend anyone try gluing the links around the sprocket one at a time.

Tracks affixed. I use Humbrol Precision Poly to attach the lengths to each other, and liquid CA glue, applied with a small brush, to actually stick the tracks to the sprockets and wheels. The CA glue will not melt polystyrene and is so thin that when it dries it is invisible.

Another view of the tracks. I endeavoured to put a slight sag along the top of the tracks. If Revell made the top row of track longer, it would be easy to bend in some sags, as it is, not enough track to get more than a slight sag.


Rear view of completed chassis and hull, test fit in progress & exhaust not fitted yet

Front view of completed chassis and hull, these have not been joined yet

Main parts of the turret, cleaned and ready to construct

Update 30 August 2012. Below is the 'ball turret' assembled, minus its hatches.
I have not decided whether to leave the hatches open or not. As there is no interior detail I may just leave the top hatch open, and put a figure in it. There is a line where the two halves of the ball turret join that needs a very light sanding. This line would not be seen when gun is in the travel position, but if guns are elevated the line becomes visible.

Another view of the ball turret, before guns were attached.

Turret in place and elevated. I damaged one of the lifting hooks when cutting another piece from the sprue, so used same diameter wire to make the rear hook, and attached with liquid CA glue. The hooks don't need replacing, they are nicely cast, if I hadn't damaged the hook I would have used the kit supplied one. Last job to do is attach hatches and exhaust system, then undercoat the model. Still unsure what kind of paint scheme to do.

Update 02 September 2012. In the below picture the hatches have all been added, (just one left open), as well as the barrel travel lock & the exhaust unit. I was thinking of adding late 'J' style exhausts, but this vehicle has 4 return rollers, and the 'J' model seems to have been made with 3, so thought it best to stick with this being a 'H' model.
Below are the two parts, complete and waiting for a base coat. Only parts still to add are spare road wheels and track links.

I still haven't decided what paint scheme to go with. So far have sprayed the vehicle matt black all over , then a light overspray with Revell Semi Matt Yellow 314, which produces a light and dark effect. The top is still not secured to the chassis, pending further painting. I may yet do a yellow/red/green scheme
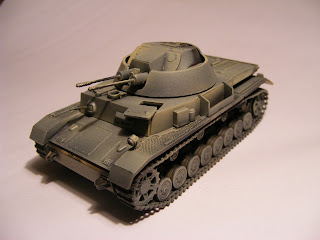
Update 09 September 2012. Today I got the basic paint job on the flakpanzer. There are no know photos of this tank in existence, so how they were painted is anybody's guess. I went for a scheme that I hope looks late war, it still needs a little tidying up, washes, detailing, etc. The Yellow is Revell Semi Matt 314, the Green is Revell Matt 68, the Red is Humbrol Matt 113.
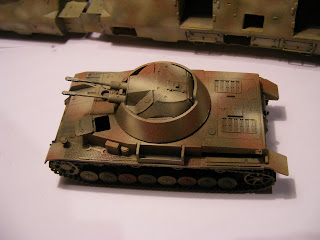
Update 16 September 2012. I quite liked the soft edged sprayed camouflage on the 09 September update, but decided a more geometric and a more sharply defined pattern might be more 'late war' looking. As no photos exist its pure speculation how these were painted, but below are two in progress pictures of how the paint job looks at present, still more work to do.


Update 06 October 2012. As this was a very late war vehicle, which operated within the limited confines of the Reich in the last days of the war, , there was no intention to heavily weather, chip, of muddy up this vehicle. Light grime only was the objective. The road wheel hubs were given a very light wash of Citadel Badab black, to highlight some detail, and the rubber on the roadwheels was painted Lifecolor Panzergray, as light dust sticks very well to rubber and lightens its colour. The vehicle was given a light overall spray of very thinned Model Master Italian Sand (ratio of about 1 part paint to 7 parts thinner) as diluted this colour looks quite like light brown grime to me. The barrels were painted Citadel Chainmail, the brushed with Badab Black. All edges of the tank were highlighted with a fine line of Lifecolor Gelbraun to highlight the edge. Pictures below


Figures on the tank are Caesar and Orion. I should also add the spare track lengths to the front, the rear lifting hook on the turret and the spare track links. Last photo is poor quality as the camera batteries were too flat to fire a flash, I will add a better photo or two in coming days.
TO BE CONTINUED
I was so interested in this kit, that as soon as I saw it was released, I ordered one, which took about 8 weeks to arrive at my home. I had some spare time on the day it arrived, so decided to start it immediately. This is one of those models that I thought would never be made in 72 scale, and I am pleased that the release of this kit proves me wrong
About the actual tank. This was a late war build, according to 'The Encyclopaedia of German Tanks of WW2' (by Chamberlain, Doyle, Jentz) and was instigated by General Guderian who demanded better defence against fighter bombers. The 3cm Doppelflak 303 (Dual AA mount) was the same as was planned for U-Boat defence, but was not actually used. The book advises two Flakpanzer IV Kugelblitz were made, delivered in February 1945, and no known combat history for these. Other sources on the web advise that 5 were built and delivered December 1944, and at least one was destroyed in combat against american armour in April 1945.
The kit. This kit comes with 4 sprues, set of instructions and painting guide, and a set of decals. 3 of the sprues are Revell's Panzer IV, and one sprue is MACOs, containing the parts to make the Flakpanzer. The box is perhaps the strongest I've seen, which is a good thing, as though my box was a bit flattened from its trip across the world, no parts were damaged.
The Build. I have never built the Revell Panzer IV, so was pleasantly surprised that everything went together so well. I have not built any Revell kit for many years, so was not sure what to expect, though I had heard good things about their Panzer IV.
The Maco parts have been engineered to a very high degree, and fit in nicely with the Revell parts.
The Instructions - these are quite clear & include a page with a cloured painting guide, but there is one thing to be aware of - the diagrams show to attach the tracks in what is normally considered the wrong direction. Those familiar with Panzer IVs will pick this up straight away, however I followed the instructions and as a result the tracks are on in what is usually considered the reverse direction.
Though period photos exist of Panzer IVs with tracks attached in the reverse direction, the vast majority of Panzer IVs were photographed with their tracks on in the forward direction. Its up to the modeller to assemble it any way they wish, but be aware that the instructions direct the modeller to attach the tracks in reverse direction. Below are scans from the Maco and Revell instructions which illustrate the difference. Click the below to get a larger view;


Below are sprue shots, the MACO replacements being in pale yellow

Below is a close up of the MACO spue, all other parts are standard Revell

Chassis and road wheels constructed with no problems, no flash or cast lines to remove

Perhaps the hardest part of the construction, removing the track pieces and affixing them. I glue the individual links to make runs of 7-8 lengths BEFORE attempting to affix them, and let them semi dry before bending them around the front sprocket or rear idler for a neat and clean result. I don't recommend anyone try gluing the links around the sprocket one at a time.

Tracks affixed. I use Humbrol Precision Poly to attach the lengths to each other, and liquid CA glue, applied with a small brush, to actually stick the tracks to the sprockets and wheels. The CA glue will not melt polystyrene and is so thin that when it dries it is invisible.

Another view of the tracks. I endeavoured to put a slight sag along the top of the tracks. If Revell made the top row of track longer, it would be easy to bend in some sags, as it is, not enough track to get more than a slight sag.

Front view , glues on display used to affix the track links and lengths to each other, and to the wheels

Rear view of completed chassis and hull, test fit in progress & exhaust not fitted yet

Front view of completed chassis and hull, these have not been joined yet

Main parts of the turret, cleaned and ready to construct

Update 30 August 2012. Below is the 'ball turret' assembled, minus its hatches.
I have not decided whether to leave the hatches open or not. As there is no interior detail I may just leave the top hatch open, and put a figure in it. There is a line where the two halves of the ball turret join that needs a very light sanding. This line would not be seen when gun is in the travel position, but if guns are elevated the line becomes visible.

Another view of the ball turret, before guns were attached.

Turret in place and elevated. I damaged one of the lifting hooks when cutting another piece from the sprue, so used same diameter wire to make the rear hook, and attached with liquid CA glue. The hooks don't need replacing, they are nicely cast, if I hadn't damaged the hook I would have used the kit supplied one. Last job to do is attach hatches and exhaust system, then undercoat the model. Still unsure what kind of paint scheme to do.

Update 02 September 2012. In the below picture the hatches have all been added, (just one left open), as well as the barrel travel lock & the exhaust unit. I was thinking of adding late 'J' style exhausts, but this vehicle has 4 return rollers, and the 'J' model seems to have been made with 3, so thought it best to stick with this being a 'H' model.
Below are the two parts, complete and waiting for a base coat. Only parts still to add are spare road wheels and track links.

I still haven't decided what paint scheme to go with. So far have sprayed the vehicle matt black all over , then a light overspray with Revell Semi Matt Yellow 314, which produces a light and dark effect. The top is still not secured to the chassis, pending further painting. I may yet do a yellow/red/green scheme

Update 09 September 2012. Today I got the basic paint job on the flakpanzer. There are no know photos of this tank in existence, so how they were painted is anybody's guess. I went for a scheme that I hope looks late war, it still needs a little tidying up, washes, detailing, etc. The Yellow is Revell Semi Matt 314, the Green is Revell Matt 68, the Red is Humbrol Matt 113.

Update 16 September 2012. I quite liked the soft edged sprayed camouflage on the 09 September update, but decided a more geometric and a more sharply defined pattern might be more 'late war' looking. As no photos exist its pure speculation how these were painted, but below are two in progress pictures of how the paint job looks at present, still more work to do.


Update 06 October 2012. As this was a very late war vehicle, which operated within the limited confines of the Reich in the last days of the war, , there was no intention to heavily weather, chip, of muddy up this vehicle. Light grime only was the objective. The road wheel hubs were given a very light wash of Citadel Badab black, to highlight some detail, and the rubber on the roadwheels was painted Lifecolor Panzergray, as light dust sticks very well to rubber and lightens its colour. The vehicle was given a light overall spray of very thinned Model Master Italian Sand (ratio of about 1 part paint to 7 parts thinner) as diluted this colour looks quite like light brown grime to me. The barrels were painted Citadel Chainmail, the brushed with Badab Black. All edges of the tank were highlighted with a fine line of Lifecolor Gelbraun to highlight the edge. Pictures below


Figures on the tank are Caesar and Orion. I should also add the spare track lengths to the front, the rear lifting hook on the turret and the spare track links. Last photo is poor quality as the camera batteries were too flat to fire a flash, I will add a better photo or two in coming days.
TO BE CONTINUED
Nice work, I've been looking at the Maco kits and I think this has convinced me to pick up a couple .....
ReplyDeletecheers
Brent
Hello Brent
Deletethanks for dropping in and looking. Glad you like the build, it really is a trouble free assembly.
cheers
Neil
Very good article that makes me really want to go too.
ReplyDelete