Saturday, January 5, 2013

Armageddon Panzerjaegerwagen

Armageddon  Panzerjaegerwagen

Armageddon is also labelled as "Production Mach 2" so I'm not certain which name most accurately describes the manufacturer.

The Panzerjaegerwagen comes as part of the BP44 train made by this company. It is not available separately. The train is sold as a half train with locomotive and tender, or you can buy a half train without the locomotive and extra tender (which add together to make a full train).

This post will show the stages of building this single wagon.

Panzerjaegerwagen. The BP42 trains had proved their value to the extent that their production continued after the first 6 were delivered in late 1942. It was decided that the train needed to be better able to defend itself from tank attacks, particularly by the increasingly common T-34. It was decided to add an armoured rail wagon with a Panzer IV turret, at both ends of the train to increase its attack and defence capability. This change saw the renaming of these trains to BP-44. Production of these wagons commenced in June 1944. Around 80 were built, and were also attached to other armoured (and also were probably used on other semi armoured or unarmoured trains). There were two types produced, the main noticeable difference being a differently shaped armoured body, and the inclusion of what seems to be a storage box on the rear superstructure. The type in this kit is the variant without the storage box.


Armageddon's kit has the body shape basically correct. The casting is not terribly good with some warping, and it has none of the bolt heads that can be seen in photos & on plans. The body had to be clamped for 24 hours to take out the warps as can be seen below.


 Next job was to lightly fill the joins, & sand them. Then I measured the length and made small marks with a pencil where the bolt heads needed to be placed. I then drilled a small hole and placed in a water filter ball with a moistened toothpick. When all were snugly placed I gave a light coat of Testor's Dullcote over them to seal them in.


From here on I did not use the parts supplied in the kit. Those supplied in the kit are not very well cast so I used replacement parts (Revell turret, RB barrel, etched turret skirts), or made parts from steel wire (staples) copper wire, brass tube, Evergreen plastic card & plastic rod or differing thickness, and stretched sprue. The parts were made ny studying pictures and scale plans in the Trojca German Armoured Train book.


Below is the completed model ready for paint, including a picture indicating what the parts were made of. All bending of metal wire was done with a tool shaped like pliers, or with metal tweezers.


Next came a coat of Revell grey enamel Matt 79


Next came an over spray of Humbrol dark yellow Matt 94


I was thinking of leaving the wagon in overall yellow, adding some washes to bring out the details. However I then decided to do a 3 colour scheme, using Humbrol red Matt 113, and Revell green Matt 68


Decals applied from the kit, vehicle then had a couple of washes of diluted Citadel Badab black acrylic wash, and the cow catcher, handlamps, buffers etc were painted. Lots of tiny marks were applied with a 000 brush in random spots all over the vehicle to denote chips, scuff marks, worn paint, scratches etc, to complete the model, final pictures below.


Tuesday, January 1, 2013

UMmt Zeppelin Armored Railcar Kit number 640

UMmt Zeppelin Armored Railcar Kit number 640

UMmt latest rail release was an unusual choice - an armoured rail car (sometimes called a draisine). Only a few pictures exist of this vehicle, and there is some debate whether only one existed or whether there were more made. UMmt acknowledge this, and state that this car operated in Finland, probably between 1941 and 1943. UMmt advise the rail car was made from parts of bagged russian trophies from the 1939-40 Winter War with the Soviet Union, the rail car having a BA-10 turret with 45mm cannon and 7.62mm MG, and was built from parts of many vehicles, which included parts from a BA-20 armoured car and from two Komsomolets artillery tractors. What became of the rail car (or cars) is unknown. This is the first 'axis' rail vehicle that UMmt have given us, all their previous have been russian rail draisines and trains. The "sister" company UM have given us a number of axis draisine kits.


In the box the box contains one sprue with polystyrene parts for the body construction, a small sprue of polystyrene parts for the turret, a set of etch parts, instructions and two small lengths of track.


First Impressions. It would appear to be quite a fast build, except for the etch parts, which always take a bit longer to remove, clean up, bend, and attach.  The chassis is just two pieces with panel joins being lightly etched into the plastic. It appears a few rivets or bolt heads will be needed, though the draisine (in period pictures) appears to be mostly unrivetted/unbolted, & the instructions advise this vehicle was mostly welded. The turret also will need a few small rivets.

First stage of build was to make the wheel assemblies and affix them. For some reason many of the underneath parts are etch, which seems unnecessary, I'd prefer to have these parts cast in plastic for simplicity of removing from sprues, clean up and attachment.

 The etch parts are very firmly attached to their sprue and it took a fresh blade in a heavy duty knife to detach them.


 Then a clean up on each part with an exacto blade to remove tiny stubs of etch.


  Parts were bent with an 'etch bending tool' and affixed with liquid super glue.

Update 10 January 2012. Below is a picture of progress to date. I scribed some body panels lines a bit deeper, and later found that some of the lines are not quite correct, when compared to period photos. I had intended to put stretched sprue into some of these lines to represent neat welds as can be seen on a couple of the clearer period photos of this railcar, but am still deciding what to do there.

The upper body and chassis are a very good fit. I have cut one of the driver's access doors open. No one knows what the interior looked like so I will not be adding any. The doorway will be filled with a figure climbing in or out.  I made side vision ports from plastic card (vision slots made with sharpened micro screw driver and exacto blade tip). The side ports supplied are about the right size, but I have used them as the front and rear vision ports. I have also used styrene rod for the buffers, and used aftermarket brass buffers, more detail why is below. Pictures below next to (modified)Armageddon Flak und Kanonenwagen.


 A total of 9 period photos have been found of this vehicle. The photos compared to the kit show a few small differences.

These differences are;

i) The large side entry doors in the kit are squared with both sides being the same length. Photos show the leading edge of the door was shorter, which created a tapered shape. The panel line above the door is cast horizontal, whereas should be angled downwards, following the line of the top of the door.

ii) The large side entry doors were not flush with the sides - photos show they protruded outwards.

iii) The driver's vision ports front and rear are quite large and the instructions show to mount them quite high in the superstructure. Photos show the front (and rear) ports were not as large as the kit depicts & need to be mounted much lower.

iv) The buffer stocks supplied in the kit have a tapered shape (similar to what is in other UMmt rail wagon kits). Photos show the buffer stocks were not tapered.
 
v) Numerous small rivets/bolt heads visible in photos are not cast on the kit

vi) Some period photos show what appear to be 'rain guards' or 'sun shields' above the front and rear vision ports. This was evidently a later addition as not in all photos. None supplied in kit.

vii) Some period photos show a small flat jutting piece of metal at the bottom of the body superstructure, front and rear, about a metre from each end. It would appear to be a kind of footstep.

viii) Period photos show some hinges and attachments on the bonnet, which are not in the kit

ix) The BA10 turret lacks vision ports and rivets/bolt heads.


All the above are small things. The kit could be built straight from the box and still be a fine looking model. They have been included for interest, and for those who may want to tackle any of the above points in their build.

Update 26 January 2013. Work and family (and the subsequent exhaustion they cause)  have kept me away from any progress for a few weeks, till now.

First up I have given the whole model a coat of grey enamel just to help to spot any poor joins or defects.

The kit has a couple of tiny sink marks and a subtle scrape mark down one side. I checked with another person who has this kit and his kit also has the scrape. It would be quite easy to fill, but I have left it, and the small sink marks as they look like real damage to the panels. Remember this is a 'home made' draisine from second hand captured war booty from the Russian/Finnish Winter War in 1940. It would be surprising if every panel was perfect.

I decided to cut open the smaller door, just for interest. The larger doors have had a sheet of styrene added to the inside to make them thicker, as photos show these large doors are not flush with body. The smaller doors do not protrude at all, so these were left as is, with some styrene added to the inside of the open door.


The kit buffers were replaced with brass ones from a model railway shop. They are much finer cast and a more correct shape.

I added the little side foot steps, that can be seen in at least one photo, to the front and rear, on each side, made from spare styrene sheet.

The turret in the kit is very plain. References show that BA-10 turrets have visible details so I added vision ports, pistol ports and rivets made from tiny water balls, placing them in countersunk holes made with a micro drill bit. A total of 43 rivets were added to the turret. I also added two join lines in the turret from styrene strip, and cut off the rear panel as it was incorrectly shaped and added a more correctly styrene piece.


 I also added rivets to the wheels, as these can be seen in at least one period photo.

Bonnet hinges can be seen in period photos, these were made from spare etch.


Update 17 March 2013. I added a few more rivets/bolt heads to the body sides & front, as can be seen in some period photos. Vehicle has now had an overall coat of Model Master enamel Italian Olive Green. No one can say with absolute certainty what colour(s) this vehicle was painted in reality, no colour pictures exist, but a shade of 'green' seems likely. Progress shots below


Updated Sunday 14 April 2013. A bit of weathering and dust has been applied, this one is now very close to completed.


TO BE CONTINUED.......

Friday, December 21, 2012

S-Model PS720009 Pz.Kpfw 38H735(f)

S-Model PS720009 Pz.Kpfw 38H735(f)

I had seen this kit on the web, and was pleased to see it stocked in my Local Hobby Store, so picked one up.  I'm a fan of french WW2 armour, and given the wide variety of french armoured vehicles that existed in that era, as a whole french armour (and softskins) really are very under represented in small scale in plastic.

Its well known that the germans inherited large numbers of french armoured vehicles in 1940 and put them all to use. Some went to german allies in eastern europe, some went to the balkan regions on anti partisan & security duties, while others remained in France on garrison duties. Numbers were still in France in 1944 after the D Day landings.

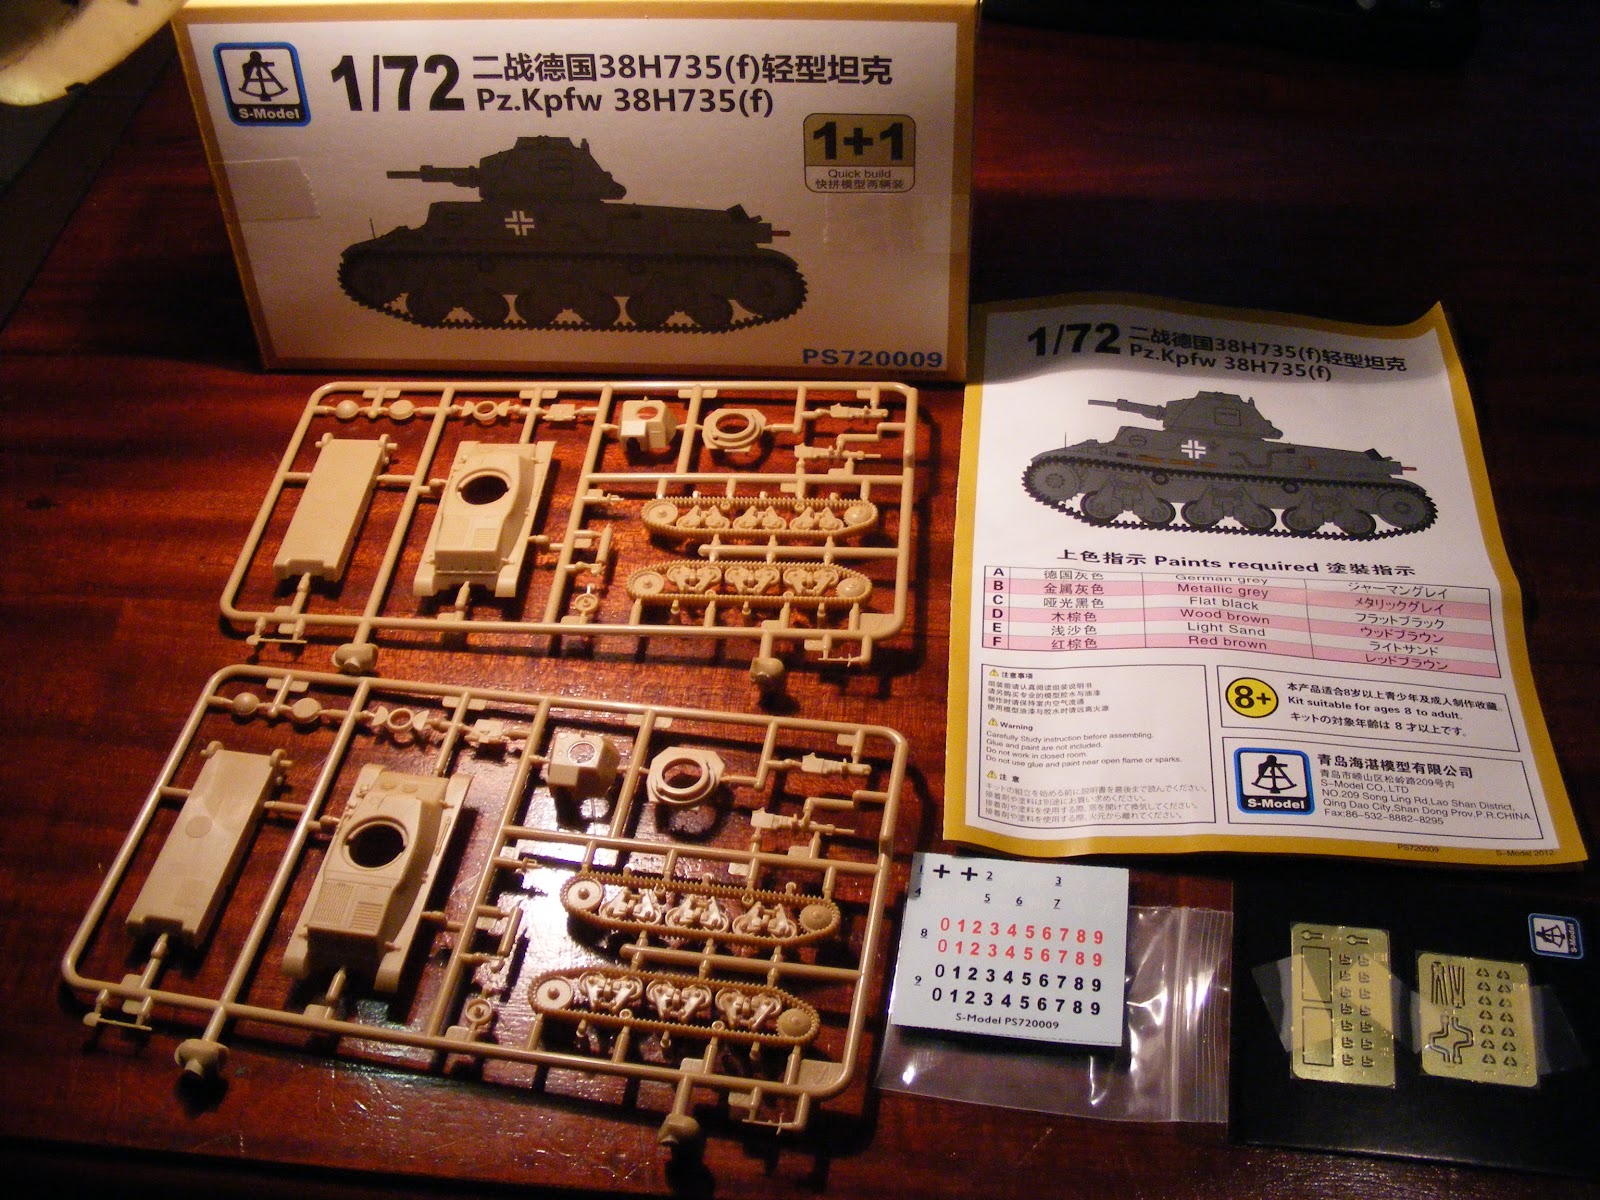
In the box. In the box are two sprues of parts sufficient to make up two tanks. One set of brass parts, one sheet of decals, one instruction sheet. The parts are well cast, and flash is virtually non existent. Two options for main armament are provided for each tank. Two german style turret cupola options are provided with open and closed hatches for each tank. One rounded turret cupola option is provided which looks to be the original french style cupola - nice if you want to build one in french service, though no decals or painting options are provided if you choose to go that way.


Scale. I don't often measure vehicles for scale, but in this case I checked the web for length and width. Assuming the published data is correct this vehicle scales very well to 1/72 scale, length is correct and width is perhaps 1 mm less.

The build so far. The build is very easy and everything fits very well (but is not finished).  The rear hatch hinges nicely, so can be open or closed, the hatch does not have to be fixed in place. Both barrel ends are already open, so no need to drill them out. The tiny letters 'HOTCHKISS' are cast on the bow of the vehicle.The body shell has a texture to it (it is not smooth) which gives it a kind of cast metal patina.


Update 22 December 2012. I have now attached the front and rear etch towing hooks and shackles, and also the hook and shackle on each side. These are very tiny and were the most time consuming part of the build, and are held in place with a tiny droplet of liquid CA glue, applied with a tooth pick. The etch covers for the exhaust muffler were also rolled and affixed.


Below are tanks almost ready ready for paint. The tools and a few other parts won't be added until painting is finished as they will get in the way.


Below are the spare parts left over - open and closed german style cupola and hatches, french style cupola, and long and short 37mm guns.


Next up I need to apply a tiny amount of filler around the turret join, and the front and rear hull join, before painting.

Update Sunday 03 February 2013. Both tanks were given a light pre shading with Tamiya Flat Black, and left to dry for a few hours. Each was the lightly sprayed with Humbrol Enamel Matt 94, heavier on the upper surfaces, to create some contrast in shading as occurs in natural sunlight. A few hours later a lighter shade, Humbrol Enamel Matt 148 was lightly applied to the upper sufraces over the Matt 94.

Next day I did a very light wash all over with watered down "Devlan Mud" which is a Citadel acrylic wash. This bought out some details as some detail is very lightly cast. Tracks were brush painted with a 00 brush with Vallejo Panzer Aces 'Track Primer"


Update 20 February 2012. I have these close enough to completed. They could maybe use a little dust or muddy splashes but for now they are finished.

I added the jack and spare wheel but did not add the shovel, pick, crank handle or wire cutters. Period photos show these tanks frequently did not carry these tools when in german service.


Things to look out for

1) the join lines of upper and lower hull and upper and lower turret halves. These joins can't be seen with the Mark 1 Eyeball, but if you take macro photos you will notice the joins.

2) the tow hooks and U bolts at each end and on each side are etch - very tiny and very easy to lose. You need CA glue to affix these, and tweezers and a steady hand. A few spares are provided in the kit which as great, I used my spares, to replace ones lost while painting.

Final Comments. These are a great pair of tanks. 4 geramn cupolas (open and closed) and 2 french cupolas, 4 tank cannon, and a good range of numerals on the decal sheet. The hinged rear opening hatch on the turrets is another nice touch.

Two outdoor shots below were taken against the evening sky.


TO BE CONTINUED.