Hello. Last year I built a large diorama for the BP-44 train which turned out reasonably well, and provided me with a good space to display a (half) BP-44 train and various other models (picture below). I've not given that diorama an official title, I usually refer to it as "Germany, Spring, 1945".

I still have other armoured train models, and decided to build another large diorama in order to display more train models as well as other vehicles. Trains are long so displays are also necessarily long. And there is a limit to how wide they can be to be practical to display or move about. The previous diorama was just under 1200 millimeters long and 200 millimeters wide (built on a store purchased shelf of those dimensions) . This new diorama is just under 1100 millimeters long and 260 millimeters wide, also to be placed on a store purchased shelf. The reason the dioramas are built a few millimeters short of the shelf edge is to allow a clear acrylic case to be placed over them, to protect the diorama from all manner of hazards, in particular dust.
The base of this diorama was built on 3 mm thick MDF (a compressed cardboard type of wood). This was a mistake as the length of the diorama meant it could flex when picked up (which would damage the future scenery). To remedy I bought another 12 mm thick piece of MDF, cut it to size and glued it under the 3mm thick piece. This has made it very stable, no flexing at all.


Like the 'Germany 1945' themed diorama, I decided to have a lower and upper area of the diorama, in order to give the scene some interest and depth.
The setting for this one is unclear yet, but it will be mid to late war, and set in a near coastal area of the Adriatic Sea or Black Sea. In general terms this means the Balkans or the South Eastern area of the (former) USSR. This potentially means the diorama could be in the Crimea, Southern Ukraine, Romania, Bulgaria, Albania, Montenegro, Bosnia, Croatia, Slovenia or northern Italy
When I have the basics of the diorama a bit further advanced I will make a clear decision as the location will influence what vehicles are placed on the diorama, final colouration of ground, type of trees, plants, structures etc.
The raised up sides and rear of the diorama are 3 mm MDF, glued together, and to the base. The rock face is corrugated cardboard, crumpled up, and attached with lots of white PVA glue. The white PVA glue softens the cardboard to help get some irregular shapes and angles, and the corrugations in the cardboard look a bit like layers of rock strata. When dry I then mixed up "plaster of paris" powder with sand from a nearby beach to give it some 'grain', and applied this roughly over the rocks and base with a large paintbrush, to help give it some texture and irregular shape, as occurs in nature.
When dry I then watered down some cheap artists acrylic paint, and roughly applied all over the surface to completely cover, and remove all trace of the white colouration. I also dipped the edge of the brush in a darker brown to give some depth and variation of shade in some parts. Still a long way to go with paintjob, and base.


At this stage I am working on the lower area of the diorama, and will work upwards to the top, where the railway lines will be.
Update Sunday 3rd February 2013. Today I used watery acrylic paint, mixed with a sand from a beach to paint the low lying area between the two high features. The idea is that this area is a low lying wetland type of area (not a swamp), that drains out to the sea. No sea water will be sculpted as insufficient space, and I want most of the low area to be usable for placement of objects, vehicles, figures. The setting is the 'dry season' with very little water draining under the bridge (presumably Summer for most places) but in Spring or the 'wet season' a greater depth and flow of water would be draining out to the (nearby) sea.
As can be seen in earlier pictures posted, the intention is to place a bridge between the gap, for rail lines to run across. The earlier pictures showed a wooden trestle type of bridge, I'm now leaning towards a stone bridge. Part of the reason for a stone bridge is it will leave some clear space underneath, which will look better and be more useful than the trestle bridge which takes up all the space. I will investigate what I can use in this space.


Update 16 March 2013. Its been over a month since the last update on this diorama. I had decided that the rock faces were too bland and plain. I decided to modify them with some rocks protruding, but this didn't work. I then stripped all the rock walls away and started afresh. I found the best thing to represent rock is actual rock. Luckily I build my dioramas sturdy as this added a few kilos to the weight. Not finished yet but I like how its going. No pictures of the failed second version, the pictures below are rock face Mark III. Vehicles placed randomly for a couple of pictures. Still much to do.


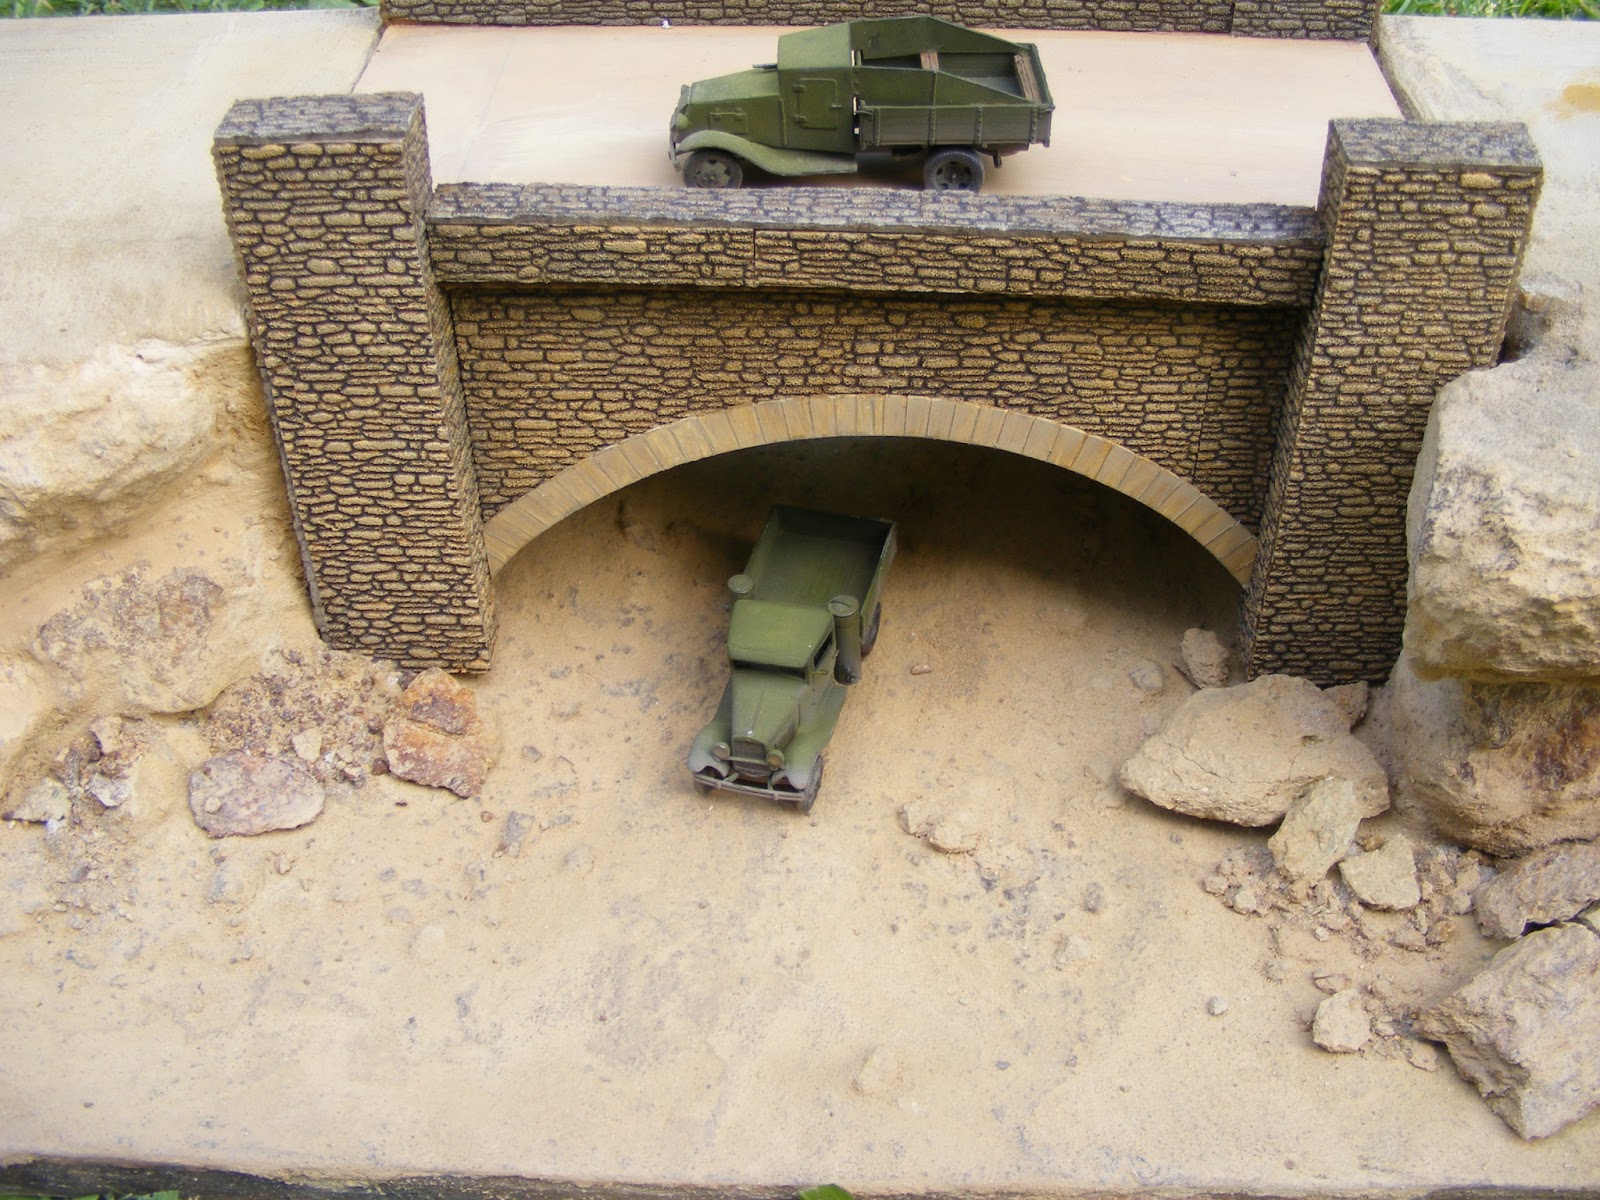
Update 17 March 2013. Today have worked on the bridge which was scratch built, cut to size to fit the diorama from scrap wood. Wood was covered with 'Busch' brand stone wall sheeting (HO 7404), cut to size. Still a lot to do to the bridge, including improving its colours


Update Sunday 14 April 2013. 4 weeks since the last update, I have been progressing the diorama, but have not had time to update this blog. I'll attempt to remedy that now.
After all the 'stonework' was applied, the bridge was painted by brush with water based acrylics. The colours were mixed to approximately match the surrounding rock face. The concept being that the bridge stonework was constructed with rock quarried on site.
In the below picture the stonework on the bridge looks a bit darker than the surrounding landscape, the paintwork on both the landscape and bridge is not yet complete. Trucks are on the bridge for the photo to illustrate the scale size of the bridge.
Next job was to lay the base for the railway tracks. I measured and cut lengths of reinforced cardboard as the road base for the track. I used some rail wagons to ensure correct width between the two tracks and bridge sides.

Next job was to lay the track. These models are 1/72 scale. A few manufacturers sell rail track in 1/72 scale, these being Hobbyboss, Italeri and UMMT. Other manufacturers supply a length of track with their rail vehicles, such as UM and ACE. Most of these choices vary in detail and appearance, and are not compatible with each other, due to differing profile of the rail track, sleeper width length and height and spacing, and slight variances in gauge (they represent Standard Gauge and Russian Broad Gauge in 1/72 scale. I was not perfectly happy with any of these choices. For me the best choice is model railway track such as Peco. Its also not perfect but is better than any of the others.
The only problem with Peco is that is 1/87 scale, so is too narrow for a 1/72 scale diorama. This diorama is 1/72 scale, with is what most of western europe used in the 20th century and still does. This diorama may be set in eastern europe. The germans energetically set upon converting russian broad gauge to european standard gauge as quickly as they could as soviet territory fell into german hands from June 1941. By the end of 1942 most of the soviet territories under german control were european standard gauge. This was not for convenience this was an urgent neccessity. Railways were the fastest and most efficient means of moving vast quantities of supplies, men and war machinery in the mid 20th century. What was more important was that trains ran on coal and water, neither of which was in short supply, and could move millions of tonnes of supplies each year without using petrol, which was in increasingly short supply during the war, and always urgently needed by the mechanised and motorised armies.
Converting the rail from russian broad gauge to standard gauge was not a complicated engineering job & only required simple tools. One rail was loosened from the sleepers (or ties), then levered inwards a few inches and refastened. The germans used work gangs of local labour in occupied territories to do this work. Vast numbers of civilians remained behind in the occupied territories, and had little choice but to work for the occupying forces. Period photos show men, sometimes in bare feet, and women, doing heavy labouring work under supervision on railway tracks in eastern europe.
Standard gauge is 1435 millimeters, measured from inside rail to inside rail. In 1/72 scale this equals 19.93 millimeters, close enough to round to 20 millimeters. HO scale track (1/87 scale) is 16 millimeters. This is too big a difference to not address, so I used a razor saw to cut down the middle each length of track, took a few minutes to do all the track. I then glued each rail on marked out lines, so that they were 20 millimetres apart. This leaves a gap in the middle, but contemporary photos show that the track almost always has ballast and soil over the sleepers between the rails so the 'gap' will be easy to remedy.

For information, russian broad gauge in 1/72 scale is 21.11 millimeters, so separating the tracks by an additional 1 millimeter from the above would create close to correct scale for russian gauge.
To make the "ballast" for the track I used some 'N' scale ballast, mixed with beach sand (picked up from a nearby beach) and watered down white woodworking glue (Shelleys or Elmers) a big squeeze of artists of brown acrylic tube paint. Unlike in the modern era, period photos of rail tracks in Russian territories in WW2 usually show mimimal use of crushed rock ballast, mostly soil and sand seems to have been used, so I have tried to replicate that here.


I have used artists acrylics, mixed in varying shades around the tracks and ballast, and used Mr Hobby acrylics to lightly spray the rock wall features to give a bit of depth and highlight the formation of the rock.
TO BE CONTINUED..........................


