S-Model kit PS720013. Maschinengewehrkraftwagen Kfz-13
Hello. I have been absent from the blog for a while. I have been away, and then caught a stomach bug which took a week to get over, and now with very cold weather have caught the flu, which has slowed me down a lot. I should be feeling much better soon.
I had no intention to add a Kfz-13 to my pile of unbuilt vehicles, however I was in my local hobby shop which had stocked up on S-Models kits, so I decided to give the Kfz 13 a go. I tend to prefer mid to late war vehicles, and am building a large diorama which is in the mid to late period so wasn't too sure what I'd do with this kit.
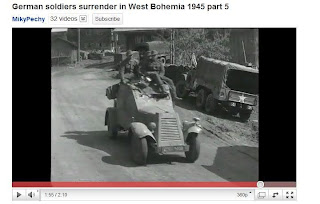
The Kfz-13. On getting home I decided to do some quick research on the web. Though most period photos show Kfz-13s in early war service in Poland in 1939 or France in 1940, one picture was found which displayed a Kfz-13 in May 1945 surrendering to US Forces in Bohemia. And it was obvious it had been modified. I determined on the spot to make one Kfz-13 as standard, and the other as the modified type in the 1945 photo. This conversion has been done by a blogger site named 'Dieselwerk' , the modeller has done fine work on the conversion in 1/35 scale.I will attempt to do fine work in 1/72 scale.
The kit. As per other S-Models kits, parts for 2 complete Kfz-13s are in the box. Which includes 2 sprues of dark grey plastic, two sets of brass etch parts, one decal sheet and one coloured instruction sheet.

The Parts. All parts were sharply cast, with virtually no flash. Some very minor seam lines on some parts were easily dealt with via a scrape with an exacto blade. The sides of these vehicles were built up with quite soft angles. The joins between the angles on the kit are quite soft, maybe a little softer than in reality. Probably better to be a little softer on the angles than too pronounced with a kit this size - its a very small vehicle. Injector marks exist on the underneath of the floor. As these won't be seen I don't care about them, though some may choose to fill them.
One casting flaw existed on both sprues. The axles and drive train are cast as one part, which is a good idea, which reduces trying to get tiny pieces correctly aligned. However the tail shaft which connects from the back of the gearbox to the rear axle differential had a small section missing. As flaws go this is not a big one - very easy to cut off the miscast drive shaft and replace it with stretched sprue, evergreen rod, or brass rod.

Assembly. Everything went together very easily. No filler or sanding needed. The wheels press on and can be rotated, though the axle assembly is quite delicate and will not bear much pressure, so rotating the wheels is not recommended.
The width indicators for the front mudguards and the rear vision mirror stalk are etch. I don't like these as they are made flat, and very 2 dimensional. In reality these are rounded rods that are very 3 dimensional looking. I made my own width indicators and rear mirror stalk from stretched sprue, drilling small holes in the mudguard to insert them into and glue. The round balls on top of the stalks are water filter balls, removed from a Brita water filter & attached with CA glue. The round mirror was cut from the etch stalk and attached to the stretched sprue stalk with CA glue.
The headlights have miniscule ledges on the front guards on which to affix them, tweezers and care needed to affix these correctly.


Omissions.
No dashboard is included. The cab facing back of the firewall is somewhat dashboard shaped, but has no detail.
Large storage box should be affixed each side to the 2 rear panels, but none come in the kit. Period photos almost always show these affixed. I supplied some the right size and shape from the spares box.
No exhaust pipe and muffler is supplied for the underside. This was easy to fashion from some Evergreen rod for the muffler and wire bent to shape for the exhaust system.

No turn indicators are supplied. Period photos almost always show these were affixed to the sides just forward of the side doors. I made some from Evergreen rod.


I also added a storage box (from the spares box) to the driver's side of the body. Period photos show sometimes non standard boxes were fitted to either side.
Not sure about the reality, but the cab floor is cast smooth - not sure what the real ones had, but if no metal tread plate, possible wooden treads would have been installed, as seen on some other early war vehicles.
Other comments. This kit builds into a very attractive model of a Kfz-13 . I compared the length, width and height advised in "The Encyclopaedia of German Tanks of World War Two" (despite the title it has details for far more than just tanks) to the actual measurements of the model, and conclude that height and width are extremely close to being 1/72 scale (within fractions of a millimetre). The length is marginally over scale (by less than a millimetre).
The 1945 photo. Only one photo exists, a still from a moving picture, and from this we can't conclude everything. What is certain is that the sides were raised up right around the open cabin area. The photo shows this clearly, as the sides and front extend above the front vision visor, which on a standard Kfz-13 is about even with the top of the cabin area. What else seems to be apparent is that a roof has been built over the open cabin. Men are seen sitting on the roof, while others are emerging from the roof, seemingly sitting up through open hatches. Similar conversions to this have been photographed on at least one Sd Kfz 250 in the mid war period.
What can't be known is the exact roof appearance as its obscured in the photo. Whether this was a one off or whether others existed is not known. When the conversion was done is not known. Very likely this is a field modification to provide extra protection of the crew from severe weather conditions and for added protection in combat conditions, should this vehicle be unfortunate enough to be caught in combat. That this vehicle survived to the end of the war suggests it was not a 'combat' vehicle, but probably a HQ or rear echelon liaison vehicle, or transport runabout, pressed into service sue to the ever increasing shortage of motorised vehicles as the war progressed.
A blog called "DIESELWERK" shows a 1/35 scale modification, which I used as inspiration. I chose a different hatch configuration on my build.
I built this kit as per the standard Kfz-13 with the same improvements, but omitted the MG due to the roof. The roof was plastic card, the hatches were from the spares box. Only other difference is the addition of an aerial mount on one side, as the intention is that this is a command liaison vehicle. Notek light was added as per period photo.


An overall coat of Humbrol rattle can primer to help identify any needs for sanding or filler


Update Sunday 30 June.
The primer revealed some tidy up needed on the 1945 version. Some sanding was done to all the added panels, and was then reprimed, result below.
Below pictures also include ACE's Kfz 14 for comparison. I will write a separate review on the ACE kit soon.


TO BE CONTINUED....................
Hello. I have been absent from the blog for a while. I have been away, and then caught a stomach bug which took a week to get over, and now with very cold weather have caught the flu, which has slowed me down a lot. I should be feeling much better soon.
I had no intention to add a Kfz-13 to my pile of unbuilt vehicles, however I was in my local hobby shop which had stocked up on S-Models kits, so I decided to give the Kfz 13 a go. I tend to prefer mid to late war vehicles, and am building a large diorama which is in the mid to late period so wasn't too sure what I'd do with this kit.
The Kfz-13. On getting home I decided to do some quick research on the web. Though most period photos show Kfz-13s in early war service in Poland in 1939 or France in 1940, one picture was found which displayed a Kfz-13 in May 1945 surrendering to US Forces in Bohemia. And it was obvious it had been modified. I determined on the spot to make one Kfz-13 as standard, and the other as the modified type in the 1945 photo. This conversion has been done by a blogger site named 'Dieselwerk' , the modeller has done fine work on the conversion in 1/35 scale.I will attempt to do fine work in 1/72 scale.
The kit. As per other S-Models kits, parts for 2 complete Kfz-13s are in the box. Which includes 2 sprues of dark grey plastic, two sets of brass etch parts, one decal sheet and one coloured instruction sheet.

The Parts. All parts were sharply cast, with virtually no flash. Some very minor seam lines on some parts were easily dealt with via a scrape with an exacto blade. The sides of these vehicles were built up with quite soft angles. The joins between the angles on the kit are quite soft, maybe a little softer than in reality. Probably better to be a little softer on the angles than too pronounced with a kit this size - its a very small vehicle. Injector marks exist on the underneath of the floor. As these won't be seen I don't care about them, though some may choose to fill them.
One casting flaw existed on both sprues. The axles and drive train are cast as one part, which is a good idea, which reduces trying to get tiny pieces correctly aligned. However the tail shaft which connects from the back of the gearbox to the rear axle differential had a small section missing. As flaws go this is not a big one - very easy to cut off the miscast drive shaft and replace it with stretched sprue, evergreen rod, or brass rod.

Assembly. Everything went together very easily. No filler or sanding needed. The wheels press on and can be rotated, though the axle assembly is quite delicate and will not bear much pressure, so rotating the wheels is not recommended.
The width indicators for the front mudguards and the rear vision mirror stalk are etch. I don't like these as they are made flat, and very 2 dimensional. In reality these are rounded rods that are very 3 dimensional looking. I made my own width indicators and rear mirror stalk from stretched sprue, drilling small holes in the mudguard to insert them into and glue. The round balls on top of the stalks are water filter balls, removed from a Brita water filter & attached with CA glue. The round mirror was cut from the etch stalk and attached to the stretched sprue stalk with CA glue.
The headlights have miniscule ledges on the front guards on which to affix them, tweezers and care needed to affix these correctly.


Omissions.
No dashboard is included. The cab facing back of the firewall is somewhat dashboard shaped, but has no detail.
Large storage box should be affixed each side to the 2 rear panels, but none come in the kit. Period photos almost always show these affixed. I supplied some the right size and shape from the spares box.
No exhaust pipe and muffler is supplied for the underside. This was easy to fashion from some Evergreen rod for the muffler and wire bent to shape for the exhaust system.

No turn indicators are supplied. Period photos almost always show these were affixed to the sides just forward of the side doors. I made some from Evergreen rod.


I also added a storage box (from the spares box) to the driver's side of the body. Period photos show sometimes non standard boxes were fitted to either side.
Not sure about the reality, but the cab floor is cast smooth - not sure what the real ones had, but if no metal tread plate, possible wooden treads would have been installed, as seen on some other early war vehicles.
Other comments. This kit builds into a very attractive model of a Kfz-13 . I compared the length, width and height advised in "The Encyclopaedia of German Tanks of World War Two" (despite the title it has details for far more than just tanks) to the actual measurements of the model, and conclude that height and width are extremely close to being 1/72 scale (within fractions of a millimetre). The length is marginally over scale (by less than a millimetre).
The 1945 photo. Only one photo exists, a still from a moving picture, and from this we can't conclude everything. What is certain is that the sides were raised up right around the open cabin area. The photo shows this clearly, as the sides and front extend above the front vision visor, which on a standard Kfz-13 is about even with the top of the cabin area. What else seems to be apparent is that a roof has been built over the open cabin. Men are seen sitting on the roof, while others are emerging from the roof, seemingly sitting up through open hatches. Similar conversions to this have been photographed on at least one Sd Kfz 250 in the mid war period.
What can't be known is the exact roof appearance as its obscured in the photo. Whether this was a one off or whether others existed is not known. When the conversion was done is not known. Very likely this is a field modification to provide extra protection of the crew from severe weather conditions and for added protection in combat conditions, should this vehicle be unfortunate enough to be caught in combat. That this vehicle survived to the end of the war suggests it was not a 'combat' vehicle, but probably a HQ or rear echelon liaison vehicle, or transport runabout, pressed into service sue to the ever increasing shortage of motorised vehicles as the war progressed.
A blog called "DIESELWERK" shows a 1/35 scale modification, which I used as inspiration. I chose a different hatch configuration on my build.
I built this kit as per the standard Kfz-13 with the same improvements, but omitted the MG due to the roof. The roof was plastic card, the hatches were from the spares box. Only other difference is the addition of an aerial mount on one side, as the intention is that this is a command liaison vehicle. Notek light was added as per period photo.


An overall coat of Humbrol rattle can primer to help identify any needs for sanding or filler
Update Sunday 30 June.
The primer revealed some tidy up needed on the 1945 version. Some sanding was done to all the added panels, and was then reprimed, result below.
Below pictures also include ACE's Kfz 14 for comparison. I will write a separate review on the ACE kit soon.
TO BE CONTINUED....................
Very useful review, Neil.
ReplyDeleteThanks!
Thanks Florin :)
ReplyDeleteLovely stuff!
ReplyDelete